Author: Predrag

  • Enhancing MemberPress Classic Editor Areas With Advanced Editor Tools

    Summary

    MemberPress uses the Classic Editor in several areas, including the Emails tab and Unauthorized Message areas. Making visual adjustments to these areas typically requires basic HTML/CSS knowledge and working in the Code tab, as only a handful of formatting options are available in the default Editor.

    This article provides instructions for installing and configuring the Advanced Editor Tools plugin (previously named TinyMCE Advanced) to enhance these Classic Editor areas with additional formatting options, eliminating the need for manual HTML/CSS coding for basic text formatting tasks.

    Troubleshooting

    Limited Formatting Options in MemberPress Classic Editor Areas

    Users frequently struggle with customizing email templates and unauthorized messages in MemberPress because the default Classic Editor provides limited formatting tools. This forces users to work directly with HTML/CSS code or limits their ability to create visually appealing content.

    Issue: Insufficient Formatting Tools in Default Editor

    The default Classic Editor in MemberPress email and message areas doesn’t include advanced formatting options such as font styling, color changes, alignment tools, and other visual formatting features commonly available in other editors.

    How to Test/Fix: Install and configure the Advanced Editor Tools plugin to extend the Classic Editor’s capabilities across all MemberPress areas that use it.

    Installing Advanced Editor Tools Plugin

    1. Navigate to Dashboard > Plugins > Add New Plugin in your WordPress admin area.
    2. In the search box, type “Advanced Editor Tools” or “TinyMCE” and press Enter.
    3. Locate the Advanced Editor Tools plugin in the search results.
    1. Click the “Install Now” button next to the plugin.
    2. Once installation completes, click the “Activate” button.

    Note: The Advanced Editor Tools plugin is also available here and was previously known as TinyMCE Advanced.

    Configuring Advanced Editor Tools for MemberPress

    1. After activation, navigate to Dashboard > Settings > Advanced Editor Tools.
    2. Click on the “Classic Editor (TinyMCE)” tab to access the toolbar configuration options.
    3. Use the drag-and-drop interface to customize the editor toolbars according to your preferences:
      • Drag buttons from the “Unused Buttons” section to add new tools;
      • Drag buttons away from the toolbar to remove unwanted tools;
      • Reorder buttons by dragging them to different positions within the toolbar;
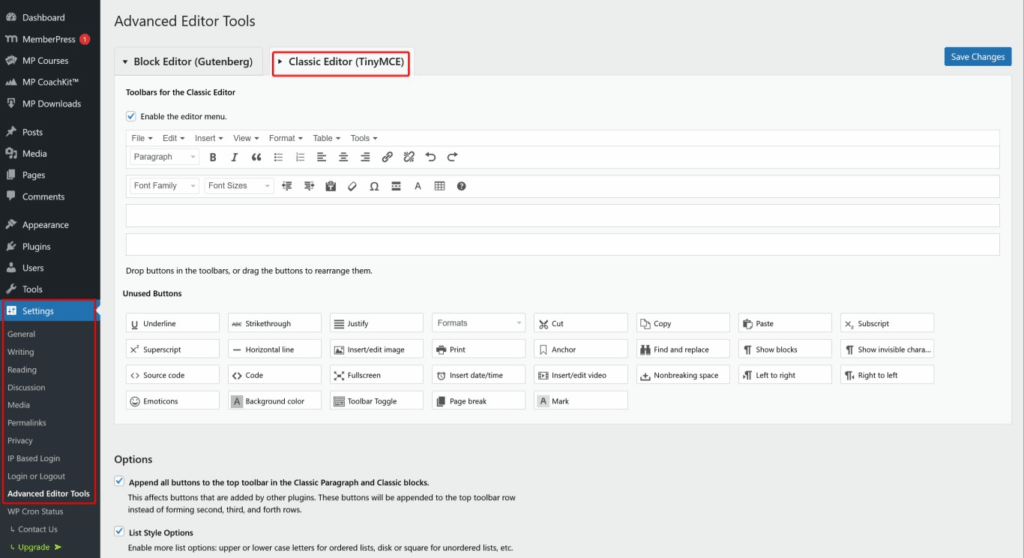
    1. Common useful additions for MemberPress areas include:
      • Font Family – For changing text fonts;
      • Font Sizes – For adjusting text size;
      • Text Color/Background Color – For color customization;
      • Alignment Tools – For text positioning;
      • Advanced Link Options – For enhanced link formatting;
    2. When satisfied with your toolbar configuration, click the “Update Changes” button.

    Verification and Usage

    After configuring the Advanced Editor Tools plugin, the enhanced toolbar will be available in all MemberPress Classic Editor areas, including:

    • Dashboard > MemberPress > Options > Emails – All email template editing areas;
    • Dashboard > MemberPress > Options > Unauthorized – Unauthorized access message areas;
    • Any other MemberPress areas that utilize the Classic Editor interface;

    Testing the Configuration:

    1. Navigate to Dashboard > MemberPress > Options > Emails.
    2. Select any email template to edit.
    3. Verify that the enhanced toolbar with your configured options is now visible.
    4. Test the new formatting tools by applying different styles to sample text.

    Additional Configuration Options

    The Advanced Editor Tools plugin provides several additional settings that can be useful for MemberPress implementations:

    • “Enable the editor menu” – Adds a traditional menu bar to the editor;
    • “Replace Block Editor” – Controls whether to use Classic Editor site-wide;
    • “Keep paragraph tags” – Prevents automatic removal of empty paragraph tags;
    • “Advanced Options” – Provides additional customization settings for power users;

    Note: These additional options should be configured based on your specific site requirements and user preferences. The default settings work well for most MemberPress implementations.

    Additional References

  • Resolving Header Duplication and Styling Issues with MemberPress BuddyPress Integration and Divi Theme

    Summary

    When MemberPress is integrated with BuddyPress using the MemberPress BuddyPress integration and the Divi theme is installed and activated, users may experience header duplication and missing or incorrect styling on BuddyPress profile pages and MemberPress account pages.

    This issue is caused by a conflict with Divi’s Static CSS File Generation and Dynamic CSS features. The solution involves disabling these specific Divi settings and clearing the site cache.

    Troubleshooting

    Header Duplication and Styling Issues on BuddyPress/MemberPress Pages

    This issue typically appears as:

    • Duplicated website header elements on BuddyPress profile pages;
    • Missing or broken styling on MemberPress account pages;
    • Layout inconsistencies specifically when all three components are active (MemberPress, BuddyPress integration, and Divi theme);

    Issue: Divi Static CSS File Generation and Dynamic CSS Conflict

    According to Divi support, this problem occurs when Divi’s Static CSS File Generation (located in Builder > Advanced) and Dynamic CSS features (located in General > Performance) interfere with the way MemberPress and BuddyPress render their pages and styling.

    How to Test/Fix: Disable Divi’s Static CSS File Generation and Dynamic CSS features using the following steps:

    1. Navigate to WordPress Dashboard > Divi > Theme Options.
    2. Click on the Builder tab.
    3. Select the Advanced sub-tab.
    4. Locate the Static CSS File Generation option.
    1. Click the Clear Static CSS File Generation button to remove existing cached files.
    1. Set the Static CSS File Generation option to Disabled and click the Save Changes button.
    1. Now navigate to the General tab in Divi Theme Options.
    2. Click on the Performance sub-tab.
    3. Find the Dynamic CSS setting and set it to Disabled and click the Save Changes button.
    1. Clear all cache on the site using your caching plugin (if applicable).
    2. Clear any server-level cache if available.
    3. Test the BuddyPress profile pages and MemberPress account pages to verify the header duplication and styling issues are resolved.

    Note: Disabling these Divi features may slightly impact site performance optimization, but it is necessary to resolve the integration conflict. Monitor your site’s performance after making these changes and consider other optimization methods if needed.

    Additional Troubleshooting Steps

    If the issue persists after disabling the Divi CSS settings:

    1. Temporarily switch to a default WordPress theme (like Twenty Twenty-Four) to confirm the issue is theme-related.
    2. Deactivate and reactivate the MemberPress BuddyPress integration add-on.
    3. Check for any custom CSS that might be interfering with the page layout.
    4. Verify that all plugins (MemberPress, BuddyPress, and Divi) are updated to their latest versions.
    5. Test in a staging environment first before applying changes to the live site.

    Public Facing Documentation / Additional References

    Public Facing Documentation

    Additional References

  • Show/Hide WordPress Admin Bar Based on User Role

    Summary

    This document explains how to control the WordPress admin bar visibility and back end access for specific user roles in MemberPress. The admin bar can interfere with membership site design or create confusion for members who don’t need administrative access.

    A guide is provided below with multiple solutions including plugin-based approaches, MemberPress native settings, and manual code implementations to hide the admin bar or restrict dashboard access based on user roles such as Subscriber, Group Leader, or Student.

    Troubleshooting

    Restrict Access to WP Admin for Users

    MemberPress includes a native setting to prevent members from accessing the WordPress dashboard (/wp-admin), which is often preferable to maintain a clean member experience.

    1. Navigate to Dashboard > MemberPress > Settings.
    2. Click the Account tab.
    3. Scroll down to the Access to WP Dashboard section.
    4. Check the box next to “Keep members out of the WordPress Dashboard” option.
    5. Click Update Options to save your settings.

    Note: This setting affects all MemberPress members but will not restrict users with Administrator, Editor, or other higher-level roles from accessing the dashboard.

    Admin Bar Appears for Non-Administrative Users

    1) Issue: Members Plugin Method

    By default, WordPress shows the admin bar to all logged-in users, including Subscribers and custom MemberPress roles like Group Leader or Student. This can create confusion and detract from the membership site experience.

    Sites already using the Members plugin by MemberPress can utilize its Admin Access add-on for more granular control over admin bar visibility and dashboard access.

    How to Test/Fix: Configure the Members plugin Admin Access add-on to control both admin bar and dashboard access simultaneously.

    1. Ensure the Members plugin is installed and activated.
    2. Go to Dashboard > Members > Add-Ons.
    3. Activate the Members – Admin Access add-on.
    4. Navigate to Dashboard > Members > Settings and click the Admin Access tab.
    5. Under Select Roles, check or uncheck roles you want to allow admin access for.
    6. Enable “Disable toolbar on the front end” for users without admin access.
    7. Click Update Settings.

    2) Issue: Admin Bar Shows for Subscribers and Custom Roles Method

    How to Test/Fix: Use the Admin Bar & Dashboard Access Control plugin to selectively hide the admin bar for specific roles while maintaining it for administrators.

    1. Install and activate the Admin Bar & Dashboard Control plugin from the WordPress repository.
    2. Navigate to Dashboard > Settings > Admin Bar & Dashboard Control.
    3. Under Admin Bar Options, uncheck the roles you want to hide the admin bar from (e.g., Subscriber, Group Leader, Student).
    4. Under Dashboard Options, select roles that should be restricted from accessing the dashboard.
    5. Click Save All Changes.
    6. Test by logging in as a user with the restricted role to confirm the admin bar is hidden.

    Members Accessing WordPress Dashboard Unnecessarily

    1) Issue: MemberPress Members Can Access /wp-admin

    MemberPress members with Subscriber or custom roles may access the WordPress dashboard, which can cause confusion and potentially expose back end elements they shouldn’t see.

    How to Test/Fix: Use MemberPress native settings to restrict dashboard access for members while maintaining access for administrators and editors.

    1. Navigate to Dashboard > MemberPress > Settings.
    2. Click the Account tab.
    3. Scroll down to the Access to WP Dashboard section.
    4. Check the box next to “Keep members out of the WordPress Dashboard”.
    5. Click Update Options to save the settings.
    6. Test by logging in as a member to confirm they cannot access /wp-admin.

    Note: This setting affects all MemberPress members but will not restrict users with Administrator, Editor, or other higher-level roles from accessing the dashboard.

    2) Issue: Custom Code Solution for Specific Requirements

    Sites requiring more granular control or custom role handling may need a code-based solution to hide the admin bar for specific roles while maintaining full functionality.

    How to Test/Fix: Add custom code to your theme’s functions.php file or a custom plugin to control admin bar visibility by user role.

    // Hide admin bar for specific user roles
    function hide_admin_bar_for_roles() {
    // Get current user
    $current_user = wp_get_current_user();

    // Define roles that should not see the admin bar
    $restricted_roles = array('subscriber', 'group_leader', 'translator');

    // Check if user has restricted role
    $user_roles = $current_user->roles;
    $has_restricted_role = array_intersect($restricted_roles, $user_roles);

    // Hide admin bar if user has restricted role
    if (!empty($has_restricted_role) && !current_user_can('edit_posts')) {
    show_admin_bar(false);
    }
    }
    add_action('wp_loaded', 'hide_admin_bar_for_roles');

    Implementation Steps:

    1. Modify the $restricted_roles array to include the specific roles you want to restrict.
    2. Add this code to your active theme’s functions.php file or create a custom plugin.
    3. Test with users from different roles to ensure proper functionality.

    Admin Bar Still Appears After Configuration

    1) Issue: Caching Plugin Conflicts

    Caching plugins may cache the admin bar state, causing it to appear inconsistently for restricted users or not hide properly after configuration changes.

    How to Test/Fix: Clear all caches and test admin bar visibility in an incognito browser session.

    1. Clear all website caches (plugin cache, server cache, CDN cache).
    2. If using a caching plugin, temporarily deactivate it for testing.
    3. Test admin bar visibility in an incognito/private browser window.
    4. If the issue persists, check for theme or plugin conflicts by switching to a default theme and deactivating plugins one by one.

    2) Issue: Theme Override Conflicts

    Some themes include their own admin bar control settings that may override plugin or MemberPress settings.

    How to Test/Fix: Check theme customizer and theme options for admin bar settings that may conflict with your configuration.

    1. Navigate to Dashboard > Appearance > Customize.
    2. Look for sections like “General Settings”“Admin Options”, or “User Experience”.
    3. Check for admin bar related settings and ensure they don’t conflict.
    4. If found, adjust theme settings to align with your desired admin bar behavior.
    5. Switch to a default WordPress theme temporarily to test if the issue is theme-related.

    Public Facing Documentation / Additional References

    Public Facing Documentation

    Additional References

  • How to Delete Transactions Not Associated with a Membership in MemberPress

    Summary

    Orphaned transactions in MemberPress are transaction records that exist in the database without being associated with any active membership. These transactions have a product_id value of 0, which indicates they are not linked to any specific membership level.

    This situation typically occurs when memberships are deleted while transaction records remain, during failed payment processes, or due to data corruption issues. This article provides a safe method to identify and remove these orphaned transaction records from the MemberPress database.

    Removing orphaned transactions helps maintain database integrity, improves site performance, and ensures accurate reporting in the MemberPress transaction system.

    Troubleshooting

    Understanding Orphaned Transaction Records

    Orphaned transactions are database entries in the wp_mepr_transactions table that have lost their connection to membership products. These records can accumulate over time and create inconsistencies in reporting and data management.

    Transactions Remain After Membership Deletion

    When a membership is deleted from MemberPress, the associated transactions may remain in the database with a product_id of 0.

    How to Test/Fix:

    Before deleting any records, identify orphaned transactions by running this query in your database management tool:

    SELECT * FROM [[TABLE_PREFIX]]mepr_transactions WHERE product_id = 0;

    Review the results to confirm these are truly orphaned records that should be removed.

    Failed Payment Processing Creates Orphaned Records

    Incomplete payment processes or gateway communication errors can create transaction records that never get properly associated with a membership.

    How to Test/Fix:

    Examine the transaction status and timestamps to identify records created during failed payment processes. Look for transactions with incomplete or error status that occurred around the same time as reported payment issues.

    Database Corruption or Import Issues

    Site migrations, database imports, or corruption can result in transaction records losing their membership associations.

    How to Test/Fix:

    Cross-reference transaction records with existing membership data to identify records that should have valid product_id values but show 0 instead.

    Safe Deletion Process for Orphaned Transactions

    Important Warning: Database modifications are irreversible and can cause significant data loss if performed incorrectly. Always create a complete database backup before proceeding with any database queries.

    Preparing for Safe Transaction Deletion

    Database operations require careful preparation to prevent data loss and ensure the ability to restore if issues occur.

    How to Test/Fix:

    1. Create a complete database backup using your hosting control panel or backup plugin.
    2. Verify the backup completed successfully and can be restored if needed.
    3. Access your database through phpMyAdmin, Adminer, or your preferred database management tool.
    4. Identify the correct table prefix for your WordPress installation (typically wp_ but may vary).
    5. Run the identification query first to see exactly which records will be affected.

    Executing the Deletion Query

    The deletion process requires precise execution of the database query to remove only the intended orphaned records.

    How to Test/Fix:

    Execute this query to delete all transactions with product_id = 0:

    DELETE FROM [[TABLE_PREFIX]]mepr_transactions WHERE product_id = 0;

    Important Note: Replace [[TABLE_PREFIX]] with your actual WordPress database table prefix if it differs from the standard prefix. The query will permanently remove all matching records from the database.

    After executing the deletion query:

    1. Verify the query executed without errors.
    2. Check the number of affected rows to confirm the expected deletion count.
    3. Navigate to Dashboard > MemberPress > Transactions to verify orphaned records are removed.
    4. Test key MemberPress functionality to ensure normal operation.

    Verifying Deletion Results and System Integrity

    After deleting orphaned transactions, the system requires verification to ensure proper operation and data integrity.

    How to Test/Fix:

    1. Run the identification query again to confirm no records with product_id = 0 remain.
    2. Check existing member accounts to ensure their transaction history remains intact.
    3. Verify reporting accuracy in Dashboard > MemberPress > Reports.
    4. Test new membership purchases to ensure transaction creation works properly.
    5. Monitor for any error messages or functionality issues over the following 24-48 hours.

    Alternative Approaches and Considerations

    Selective Deletion Based on Additional Criteria

    Some situations may require more selective deletion based on transaction age, status, or other criteria rather than removing all orphaned records.

    How to Test/Fix:

    Use modified queries to target specific subsets of orphaned transactions:

    // Delete orphaned transactions older than 30 days
    DELETE FROM [[TABLE_PREFIX]]mepr_transactions 
    WHERE product_id = 0 
    AND created_at < DATE_SUB(NOW(), INTERVAL 30 DAY);
    
    // Delete orphaned transactions with specific status
    DELETE FROM [[TABLE_PREFIX]]mepr_transactions 
    WHERE product_id = 0 
    AND status = 'failed';

    Preventing Future Orphaned Transaction Creation

    Implementing preventive measures reduces the likelihood of creating orphaned transactions in the future.

    How to Test/Fix:

    1. Always review transaction dependencies before deleting memberships.
    2. Use MemberPress built-in deletion processes rather than direct database modifications.
    3. Regularly monitor transaction data integrity through database health checks.
    4. Implement proper backup and monitoring procedures for payment gateway integrations.
    5. Keep MemberPress and payment gateway plugins updated to prevent known issues.

    Public Facing Documentation / Additional References

    Public Facing Documentation

    Developer Documentation

  • How to Change the Product Icon on the Checkout Page When the ReadyLaunch Template Is Enabled

    Summary

    This document explains how to customize the product icon displayed on the checkout invoice when using the MemberPress ReadyLaunch template. The ReadyLaunch template does not include a built-in option to change the default product icon that appears in the checkout process.

    This article provides two methods for customizing the product icon: using CSS to replace the image, and creating a custom template file to override the default icon. Both solutions allow site administrators to display custom product images that align with their branding.

    Troubleshooting

    Prerequisites

    Before implementing these solutions, ensure the following requirements are met:

    • An active MemberPress installation with ReadyLaunch template enabled;
    • Basic understanding of CSS (for Method 1) or PHP template customization (for Method 2);
    • Custom image files uploaded to the WordPress media library or server;

    Understanding the Issue

    When using the MemberPress ReadyLaunch template, the checkout page displays a default product icon in the invoice section. Currently, MemberPress does not provide a built-in setting to customize this product icon through the admin interface. The default icon may not match site branding or specific product imagery requirements.

    This requires custom code or template modifications to display alternative product icons on the checkout page.

    Method 1: Using CSS to Replace the Product Icon

    The first method uses CSS to hide the original product icon and replace it with a custom background image. This approach requires minimal file modification but provides less control over the HTML structure.

    Step 1: Prepare the Custom Image

    1. Navigate to Dashboard > Media > Add New.
    2. Upload the desired product icon image.
    3. Click on the uploaded image and copy the file URL.
    4. Note the image dimensions for optimal display sizing.

    Step 2: Add Custom CSS

    1. Navigate to Dashboard > Appearance > Customize.
    2. Click Additional CSS.
    3. Add the following CSS code:
    /* Hide the original product icon and replace with custom image */
    .mp-cart-item-image img {
        display: none; /* Hide the original image */
    }
    .mp-cart-item-image {
        background-image: url('[[CUSTOM_IMAGE_URL]]');
        background-size: cover;
        background-position: center;
        background-repeat: no-repeat;
        width: 60px; /* Adjust as needed */
        height: 60px; /* Adjust as needed */
    }
    1. Replace [[CUSTOM_IMAGE_URL]] in the background-image property with the copied image URL.
    2. Adjust the width and height values to match the desired icon size.
    3. Click Publish to save the changes.

    Step 3: Test the Changes

    1. Navigate to a membership checkout page on the frontend.
    2. Verify that the custom product icon displays correctly.
    3. Check the icon appearance across different devices and browsers.

    Method 2: Creating a Custom Template Override

    The second method involves creating a custom template override file to replace the default product icon. This approach provides complete control over the HTML structure and image attributes.

    Step 1: Locate the Template File

    The ReadyLaunch checkout invoice template is located at: /memberpress/app/views/readylaunch/checkout/invoice.php

    Step 2: Create the Template Override

    1. Access the site files via FTP, cPanel File Manager, or hosting control panel.
    2. Navigate to the active theme directory: /wp-content/themes/[[THEME_NAME]]/
    3. Create the following directory structure: memberpress/readylaunch/checkout/
    4. Copy the original invoice.php file from the MemberPress plugin directory to the newly created theme directory.

    Note: [[THEME_NAME]] will show the actual name of the theme being used on the site in /wp-content/themes/[[THEME_NAME]]/

    Step 3: Modify the Template File

    1. Open the copied invoice.php file in a code editor.
    2. Locate the following line of code:
    <img src="<?php echo esc_url(MEPR_IMAGES_URL . '/checkout/product.png'); ?>" alt="" role="presentation" />
    1. Replace the image path with the custom image URL:
    <img src="<?php echo esc_url('[[CUSTOM_IMAGE_PATH]]'); ?>" alt="" role="presentation" />
    1. Replace [[CUSTOM_IMAGE_PATH]] with the actual location of the custom product icon. Example: /wp-content/uploads/2024/02/custom-product-icon.png
    2. Save the file changes.

    Step 4: Upload Custom Image

    1. Upload the custom product icon to the specified directory path.
    2. Ensure the image file permissions allow web access.
    3. Verify the image URL is accessible by visiting it directly in a browser.

    Template Override Benefits

    Creating a template override provides several advantages over the CSS method:

    • Complete control over the HTML structure and image attributes;
    • Ability to add conditional logic for different products;
    • Easier maintenance and updates;
    • Better semantic HTML structure;

    Custom Icon Not Displaying (CSS Method)

    If the custom icon is not appearing after implementing the CSS method:

    1. Verify the image URL is correct and accessible by visiting it directly in a browser.
    2. Check that the CSS selectors match the ReadyLaunch template structure using browser developer tools.
    3. Clear browser cache and any caching plugins.
    4. Inspect the page elements to confirm the CSS is being applied correctly.
    5. Test with a different image format to rule out compatibility issues.

    Template Override Not Working

    If the template override is not functioning properly:

    1. Verify the directory structure matches exactly: [[THEME_NAME]]/memberpress/readylaunch/checkout/invoice.php
    2. Check file permissions on the template file and custom image (typically 644 for files).
    3. Ensure the custom image path is correct and accessible.
    4. Clear any caching mechanisms that might prevent template changes from taking effect.
    5. Temporarily deactivate other plugins to rule out conflicts.

    Image Display Problems

    For image sizing or positioning problems:

    1. Adjust the width and height values in the CSS method to match your image dimensions.
    2. Optimize image dimensions before uploading (recommended: 60×60 pixels for optimal display).
    3. Use appropriate image formats (JPG, PNG, or WebP).
    4. Test the display on multiple devices and screen sizes.
    5. Consider using CSS object-fit property for better image scaling control.

    Public Facing Documentation / Additional References

    Public Facing Documentation

    Additional References

  • Export All Recurring Subscriptions From Database

    Summary

    This article provides a comprehensive database query for exporting all recurring subscription data from MemberPress. The query retrieves detailed subscription information including user details, payment gateway information, transaction counts, expiration dates, and subscription status.

    This solution is designed for advanced users and developers who need to extract subscription data directly from the database for reporting, migration, or analysis purposes. The query joins multiple MemberPress database tables to provide a complete view of subscription data.

    Troubleshooting

    Database Query for Subscription Export

    Need to Export All Recurring Subscription Data

    When standard MemberPress export options do not provide sufficient detail or when bulk data extraction is required for analysis or migration purposes.

    How to Test/Fix: Use the comprehensive database query below to extract all recurring subscription information. This query must be executed directly in the database using phpMyAdmin, MySQL Workbench, or similar database management tools.

    Warning: Always create a complete database backup before running any direct database queries. Test queries on a staging environment first.

    SELECT 'subscription' AS `sub_type`, 
           sub.id AS `id`, 
           u.user_email AS `user_email`, 
           sub.gateway AS `gateway`, 
           u.user_login AS `member`, 
           (SELECT um_fname.meta_value
            FROM wp_usermeta AS um_fname
            WHERE um_fname.user_id = u.ID
            AND um_fname.meta_key = 'first_name'
            LIMIT 1) AS `first_name`, 
           (SELECT um_lname.meta_value
            FROM wp_usermeta AS um_lname
            WHERE um_lname.user_id = u.ID
            AND um_lname.meta_key = 'last_name'
            LIMIT 1) AS `last_name`, 
           prd.post_title AS `product_name`, 
           (SELECT COUNT(*)
            FROM wp_mepr_transactions AS txn_cnt
            WHERE txn_cnt.subscription_id=sub.id
            AND txn_cnt.status='complete') AS `txn_count`, 
           expiring_txn.expires_at AS `expires_at`, 
           sub.subscr_id AS `subscr_id`, 
           sub.user_id AS `user_id`, 
           sub.product_id AS `product_id`, 
           sub.coupon_id AS `coupon_id`, 
           sub.price AS `price`, 
           sub.status AS `status`, 
           sub.created_at AS `created_at`, 
           sub.total AS `total`, 
           sub.tax_rate AS `tax_rate`, 
           sub.tax_amount AS `tax_amount`, 
           (SELECT CASE
             WHEN expiring_txn.expires_at = 0
             OR expiring_txn.expires_at = '0000-00-00 00:00:00'
             THEN 'Yes'
             WHEN expiring_txn.expires_at IS NULL
             OR expiring_txn.expires_at < '2023-09-26 09:27:21'
             THEN 'No'
             WHEN expiring_txn.status IN ('confirmed','complete')
             AND expiring_txn.txn_type IN ('subscription_confirmation','sub_account','wc_transaction')
             THEN 'Yes'
             ELSE 'Yes'
            END ) AS `active`
    FROM wp_mepr_subscriptions AS sub
    LEFT JOIN wp_users AS u
      ON u.ID = sub.user_id
    LEFT JOIN wp_posts AS prd
      ON prd.ID = sub.product_id
    LEFT JOIN wp_mepr_transactions AS first_txn
      ON first_txn.id=(
        SELECT ft1.id
        FROM wp_mepr_transactions AS ft1
        WHERE ft1.subscription_id=sub.id
        AND ft1.status IN ('confirmed','complete')
        ORDER BY ft1.id ASC
        LIMIT 1 )
    LEFT JOIN wp_mepr_transactions AS last_txn
      ON last_txn.id=(
        SELECT lt1.id
        FROM wp_mepr_transactions AS lt1
        WHERE lt1.subscription_id=sub.id
        AND lt1.status IN ('confirmed','complete')
        ORDER BY lt1.id DESC
        LIMIT 1 )
    LEFT JOIN wp_mepr_transactions AS expiring_txn
      ON expiring_txn.id = (
        SELECT t.id
        FROM wp_mepr_transactions AS t
        WHERE t.subscription_id=sub.id
        AND t.status IN ('confirmed','complete')
        AND ( t.expires_at = '0000-00-00 00:00:00'
        OR ( t.expires_at <> '0000-00-00 00:00:00'
        AND t.expires_at=(
          SELECT MAX(t2.expires_at)
          FROM wp_mepr_transactions as t2
          WHERE t2.subscription_id=sub.id
          AND t2.status IN ('confirmed','complete') ) ) )
        ORDER BY t.expires_at
        LIMIT 1 )
    LEFT JOIN wp_mepr_corporate_accounts AS ca
      ON ca.obj_type='subscriptions'
      AND sub.id=ca.obj_id
    ORDER BY `id` DESC;

    Understanding Query Output Columns

    The query returns comprehensive subscription data with specific column meanings that require explanation for proper interpretation.

    How to Test/Fix: The query output includes the following key columns:

    • sub_type: Always returns “subscription” to identify record type
    • id: Unique subscription ID from MemberPress
    • user_email: Member’s email address
    • gateway: Payment gateway ID used.
    • member: WordPress username
    • first_namelast_name: Member’s personal information
    • product_name: Name of the membership product
    • txn_count: Number of completed transactions for this subscription
    • expires_at: Next expiration date
    • subscr_id: Gateway subscription ID
    • price: Subscription price
    • status: Current subscription status
    • active: Calculated active status (Yes/No)

    Customizing Query for Specific Requirements

    The base query may need modification to filter results or include additional data points based on specific business needs.

    How to Test/Fix: Common modifications include:

    1. Add WHERE sub.status = ‘active’ to filter only active subscriptions.
    2. Add WHERE sub.gateway = ‘gateway-ID’ to filter by specific payment gateway ID.
    3. Modify the date in the active calculation logic to match current requirements.
    4. Add LIMIT [[NUMBER]] clause to restrict result count for testing.

    Database Table Prefix Variations

    WordPress installations may use different database table prefixes instead of the standard wp_ prefix.

    How to Test/Fix: Replace all instances of wp_ in the query with the actual table prefix used in the WordPress installation. Common alternatives include wpdb_wordpress_, or custom prefixes. Check the wp-config.php file for the $table_prefix value.

    Query Performance on Large Databases

    The query uses multiple subqueries and JOINs which may cause performance issues on databases with large numbers of subscriptions and transactions.

    How to Test/Fix: For better performance on large databases:

    • Run the query during low-traffic periods;
    • Add appropriate WHERE clauses to limit the result set;
    • Consider breaking the query into smaller chunks using LIMIT and OFFSET;
    • Ensure proper database indexes exist on join columns;

    Note: This query is designed for direct database access and should only be executed by users with appropriate database permissions and technical knowledge.

    Public Facing Documentation / Additional References

    Public Facing Documentation

    Developer Documentation

  • Display Subscription ID, Name, and User ID for Cancelled Subscriptions with a Specific Coupon

    Summary

    This document provides a SQL query solution for retrieving cancelled subscriptions where a specific coupon was used. This is particularly useful for tracking promotional campaigns and identifying users who utilized discount codes before cancelling their memberships.

    The solution allows support team members to quickly identify subscription details including internal subscription IDs, gateway subscription IDs, and user IDs for cancelled memberships associated with specific coupons.

    Troubleshooting

    Retrieving Cancelled Subscriptions by Coupon

    When you need to identify users who used a specific coupon and later cancelled their subscription, you can use a SQL query to extract this information directly from the MemberPress database tables.

    SQL Query for Cancelled Subscriptions

    Use the following SQL query to retrieve subscription information for cancelled memberships that used a specific coupon:

    SELECT s.id, s.subscr_id, user_id FROM wp_mepr_subscriptions AS s
    WHERE id IN (
    SELECT subscription_id FROM wp_mepr_transactions WHERE coupon_id = 588 AND subscription_id > 0
    ) AND s.status = 'cancelled';

    Note: The above example shows the coupon_id as 588. Replace 588 with the actual coupon ID you want to search for. To find the coupon ID, navigate to Dashboard > MemberPress > Coupons, edit the specific coupon, and look for the number in the URL (e.g., post=650 indicates coupon ID 650).

    As an example, the two screenshot examples below show a post=588 which means the coupon ID is 588.

    Query Results: This query returns three key pieces of information:

    • The internal subscription ID (s.id);
    • The gateway subscription ID (s.subscr_id);
    • The user ID (user_id) of the member who cancelled;

    How to Execute the Query

    There are several methods to run SQL queries on your WordPress database:

    1. phpMyAdmin: Access through your web host’s control panel (cPanel). Navigate to your database and use the SQL tab to execute the query.
    2. Database Plugins: Install plugins like SQL Buddy or WP phpMyAdmin Extension from the WordPress repository.
    3. Direct Database Access: Use database management tools if you have direct server access.

    Note: Database access requires administrator-level permissions. Always create a database backup before running queries on production sites.

    Use Cases

    This query is particularly useful for:

    • Excluding users from future promotional campaigns who previously used coupons and cancelled;
    • Analyzing the effectiveness of discount campaigns;
    • Identifying patterns in subscription cancellations related to promotional offers;
    • Customer retention analysis and follow-up campaigns;

    Tracking Active Subscriptions

    As a note, if you want to adapt this query for active subscriptions instead of cancelled ones, modify the status condition:

    -- Change from:
    AND s.status = 'cancelled'
    
    -- To:
    AND s.status = 'active'

    Public Facing Documentation / Additional References

    Public Facing Documentation

    Developer Documentation

    Additional References

  • False Download Counts on MP Downloads When Updating Files (Hostinger + InMotion)

    Summary

    MemberPress Downloads may show inflated or false download counts when files are updated on certain hosting environments, particularly Hostinger and InMotion hosting. This occurs when the hosting provider’s internal systems automatically access or “touch” the download files after they are updated, causing MP Downloads to register these automated server requests as legitimate user downloads.

    The issue typically manifests as download counts incrementing immediately after file updates without any actual user downloads taking place. This article provides a code solution to prevent these false counts by filtering out requests from the hosting environment’s internal services.

    Troubleshooting

    Understanding False Download Count Behavior

    The false download counts occur when hosting providers use internal services or optimization tools that automatically scan, cache, or validate uploaded files. These automated processes trigger MP Downloads’ counting mechanism even though no real user has downloaded the file.

    1) Issue: LiteSpeed and Internal Services Pinging Files

    Hosting providers like Hostinger and InMotion often use LiteSpeed web servers with optimization features that automatically scan new or updated files. When MP Downloads files are updated, these services access the download URLs to check file integrity or for caching purposes.

    How to Test/Fix: 

    Monitor the download counts immediately after updating a file. If counts increase without user activity, and the server logs show requests with user agents containing the site’s domain name, this indicates internal service access. The solution involves filtering these requests using a code snippet.

    2) Issue: User Agent Contains Site Domain

    The automated requests from hosting services often have user agent strings that include the site’s own domain name. This is a telltale sign that the request originates from the hosting environment rather than a real user’s browser.

    How to Test/Fix: 

    Check server access logs for download requests where the user agent string contains your site’s domain. Real user browsers will have user agent strings like “Mozilla/5.0” or “Chrome/xxx” but will not contain your site’s domain name.

    3) Issue: Immediate Count Increments After File Updates

    False counts typically occur within minutes of updating a download file, often before any users could realistically access the updated content.

    How to Test/Fix: 

    Document the timing of count increases relative to file update times. If counts increment immediately after updates, especially during low-traffic periods, this suggests automated system access rather than genuine user downloads.

    Code Solution Implementation

    4) Issue: Preventing False Counts with Filter Code

    MP Downloads provides a filter hook that allows administrators to prevent count increments under specific conditions. The recommended solution checks if the user agent contains the site’s domain name.

    How to Test/Fix: 

    Add the following code to prevent false count increments:

    // MP Downloads - Prevent false counts from hosting environment services
    add_filter('mpdl_download_file_request', function($count, $plugin, $action, $file){
        if(strpos($_SERVER['HTTP_USER_AGENT'], $_SERVER['HTTP_HOST']) !== false) {
            $count = false;
        }
        return $count;
    }, 10, 5);

    This code should be added to your child theme’s functions.php file or implemented using a code management plugin like WPCode.

    5) Issue: Code Implementation Methods

    The filter code can be implemented in several ways depending on your site setup and preferences.

    How to Test/Fix: 

    Choose one of these implementation methods:

    • Child Theme Functions.php: Navigate to Dashboard > Appearance > Theme Editor, select your child theme, and add the code to the functions.php file;
    • WPCode Plugin: Install the WPCode plugin, navigate to Dashboard > Code Snippets > Add Snippet, create a new PHP snippet, and paste the code;

    6) Issue: Testing the Fix Implementation

    After implementing the code solution, verification is required to ensure false counts are prevented while legitimate downloads are still tracked.

    How to Test/Fix: 

    Follow these testing steps:

    • Note the current download count for a specific file;
    • Update the download file with a new version;
    • Monitor the count for 30 minutes to ensure it does not increment automatically;
    • Test a legitimate download from a different browser or device to confirm counts still track real downloads;
    • Check server logs to verify that requests with domain-containing user agents are being filtered out;

    Additional Hosting Environment Considerations

    7) Issue: Other Hosting Providers with Similar Issues

    While Hostinger and InMotion are commonly affected, other hosting providers may exhibit similar behavior with optimization services or caching systems.

    How to Test/Fix: 

    If experiencing false counts on other hosting providers, examine the user agent strings in server logs for patterns that indicate automated system requests. The same filter code can be modified to target different user agent patterns if needed.

    8) Issue: Impact on Download Analytics

    False counts can significantly skew download analytics and reporting, making it difficult to accurately assess content performance or user engagement.

    How to Test/Fix: 

    Before implementing the fix, document current download patterns to establish a baseline. After implementation, monitor analytics for more realistic download patterns that align with actual user activity and site traffic.

    Warning: Always create a complete backup of your website before implementing any code changes. This filter code specifically targets requests where the user agent contains your site’s domain name. If implemented incorrectly, it could potentially affect all download tracking functionality. Test the implementation on a staging site first if possible.

    Public Facing Documentation / Additional References

    Public Facing Documentation

    Developer Documentation

  • How to Disable Right-Click and Content Copying for Non-Members in MemberPress

    Summary

    This document provides a solution for disabling right-click functionality and restricting content selection and copying on the frontend for non-members while maintaining normal browser functionality for active MemberPress members. The solution combines a third-party content protection plugin with custom code to selectively apply protection based on membership status.

    The implementation requires two plugins and a custom code snippet that checks user membership status and conditionally overrides content protection features. This approach ensures that only users without active memberships experience restricted functionality while maintaining a seamless browsing experience for paying members.

    Troubleshooting

    Implementation Requirements and Setup

    Missing Required Plugins

    The content protection solution depends on two specific plugins that must be properly installed and activated before implementing the custom code.

    How to Test/Fix: Verify both plugins are installed and activated:

    1. Navigate to Dashboard > Plugins > Installed Plugins.
    2. Confirm WP Content Copy Protector is installed and activated. If not, install from WordPress Plugin Directory.
    3. Confirm WPCode is installed and activated. If not, install from WordPress Plugin Directory.
    4. Ensure MemberPress is active and properly configured with memberships.

    Custom Code Implementation

    The custom code snippet must be properly added to override the content protection plugin for active members only.

    How to Test/Fix: Add the custom code using WPCode:

    1. Navigate to Dashboard > Code Snippets > Add Snippet.
    2. Select Add Your Custom Code (New Snippet).
    3. Set the code type to PHP Snippet.
    4. Enter a descriptive title such as “MemberPress Content Protection Override”.
    5. Paste the following code in the code editor:
    // Override content protection for active MemberPress members
    add_action('wp_footer', function() {
        // Check if MemberPress is active
        if (!class_exists('MeprUser')) {
            return;
        }
        
        // Check if user is logged in
        if (!is_user_logged_in()) {
            return;
        }
        
        // Get current user
        $user_id = get_current_user_id();
        $mepr_user = new MeprUser($user_id);
        
        // Check if user has any active memberships
        $active_memberships = $mepr_user->active_product_subscriptions('ids');
        
        // Only proceed if user has at least one active membership
        if (!empty($active_memberships)) {
            ?>
            <script>
            // Wait for DOM and all scripts to load
            window.addEventListener('load', function() {
                // Remove all the plugin's event handlers
                var events = ['contextmenu', 'dragstart', 'selectstart', 'keydown', 'mousedown', 'click'];
                events.forEach(function(event) {
                    document['on' + event] = null;
                    document.removeEventListener(event, function(){return false}, false);
                });
                
                // Re-enable selection
                document.body.style.userSelect = 'auto';
                document.body.style.webkitUserSelect = 'auto';
                document.body.style.mozUserSelect = 'auto';
                document.body.style.msUserSelect = 'auto';
                document.body.classList.remove('unselectable');
                document.body.removeAttribute('unselectable');
                
                // Remove protection from all elements
                var allElements = document.getElementsByTagName('*');
                for (var i = 0; i < allElements.length; i++) {
                    allElements[i].style.userSelect = 'auto';
                    allElements[i].style.webkitUserSelect = 'auto';
                    allElements[i].removeAttribute('unselectable');
                    allElements[i].onmousedown = null;
                    allElements[i].onselectstart = null;
                }
                
                // Override the plugin's functions if they exist
                if (typeof show_wpcp_message !== 'undefined') {
                    window.show_wpcp_message = function() { return false; };
                }
                if (typeof disable_copy !== 'undefined') {
                    window.disable_copy = function() { return true; };
                }
                if (typeof disable_copy_ie !== 'undefined') {
                    window.disable_copy_ie = function() { return true; };
                }
            });
            </script>
            <?php
        }
    }, 9999);
    1. Set the snippet to Auto Insert and choose Site Wide Footer.
    2. Click Save Snippet and ensure it is Active.

    Testing and Verification

    Verifying Protection Works for Non-Members

    The content protection should be active for visitors who are not logged in or do not have active memberships.

    How to Test/Fix: Test the protection functionality:

    1. Log out of the WordPress site or use an incognito browser window.
    2. Visit protected content pages on the frontend.
    3. Attempt to right-click on content – this should be disabled.
    4. Try to select and copy text – this should be restricted.
    5. Test keyboard shortcuts like Ctrl+ACtrl+C – these should be blocked.

    Verifying Normal Functionality for Active Members

    Active MemberPress members should have full browser functionality restored while viewing protected content.

    How to Test/Fix: Test member access:

    1. Log in as a user with an active MemberPress membership.
    2. Navigate to protected content pages.
    3. Confirm right-click functionality works normally.
    4. Verify text selection and copying works without restrictions.
    5. Test that keyboard shortcuts function properly.

    Common Implementation Issues

    Code Not Executing or JavaScript Errors

    The custom code may not execute properly due to plugin conflicts or JavaScript errors in the browser console.

    How to Test/Fix: Debug the implementation:

    1. Open browser developer tools and check the Console tab for JavaScript errors.
    2. Verify the custom code snippet is active in Dashboard > Code Snippets.
    3. Check that the WP Content Copy Protector plugin settings are properly configured.
    4. Test with other plugins temporarily deactivated to identify conflicts.
    5. Ensure the code is added with priority 9999 to execute after other scripts.

    Protection Not Working on Specific Page Types

    Some page types or themes may not properly load the content protection or override scripts.

    How to Test/Fix: Extend protection coverage:

    1. Test protection on different page types: posts, pages, custom post types.
    2. Check if the theme interferes with JavaScript execution.
    3. Verify that both plugins load their scripts on all relevant page types.
    4. Consider adding conditional checks for specific page types if needed.

    Membership Status Detection Problems

    The code may not properly detect active memberships due to MemberPress configuration or user role issues.

    How to Test/Fix: Verify membership detection:

    1. Confirm users have active (not expired) MemberPress subscriptions.
    2. Check that memberships are properly assigned in Dashboard > MemberPress > Subscriptions.
    3. Verify the MeprUser class is available and functioning.
    4. Test with different membership types and subscription statuses.
    5. Add temporary logging to verify which users are detected as having active memberships.

    Browser Compatibility: This solution uses modern JavaScript features and may not work in older browsers. The content protection plugin itself may also have varying effectiveness across different browsers and devices. Always test thoroughly on your target browsers and consider that determined users may still find ways to bypass client-side protection methods. For highly sensitive content, consider server-side protection methods instead.

    Public Facing Documentation / Additional References

    Public Facing Documentation

    Developer Documentation

  • How to Clear Fraudulent Users from MemberPress Database

    Summary

    This document provides a database solution for removing fraudulent or spam users and their associated pending transactions and subscriptions from MemberPress. This method is useful when dealing with bulk spam registrations that follow identifiable email patterns and need to be cleaned from the database efficiently.

    The solution involves running specific SQL queries to delete pending transactions and subscriptions for users whose email addresses match spam patterns, helping maintain database integrity and prevent fraudulent membership access.

    Troubleshooting

    Bulk Fraudulent User Registrations

    When fraudulent users register in bulk on MemberPress sites, they often create pending transactions and subscriptions that clutter the database and can potentially cause issues with legitimate member management.

    Common indicators:

    • Multiple user registrations with similar email patterns (e.g., randomstring123@example.com, randomstring456@example.com);
    • Pending transactions or subscriptions from suspicious accounts;
    • Unusual registration spikes from specific email domains;

    1) Issue: Database Contains Fraudulent Pending Records

    Fraudulent users create pending transactions and subscriptions that need to be removed to maintain database integrity.

    How to Test/Fix:

    Important: Always create a backup before running database queries

    1. Navigate to your hosting control panel or use a backup plugin.

    2. Create a full backup of the wp_mepr_transactions and wp_mepr_subscriptions tables.

    3. Store the backup in a secure location for potential restoration.

    4. Review your user list to identify common patterns in fraudulent email addresses.

    5. Access your WordPress database through phpMyAdmin, database management tool, or hosting panel.

    6. Locate your WordPress database (usually prefixed with your site name).

    7. Run the cleanup queries below, replacing [[SPAM_PATTERN]] with your identified pattern:

    First, delete pending transactions:

    // MemberPress Fraudulent User Cleanup - Delete Pending Transactions
    // Replace [[SPAM_PATTERN]] with the actual spam email pattern (e.g., %bot%, %@spam.com, etc.)
    DELETE FROM wp_mepr_transactions
    WHERE user_id IN (
      SELECT ID
      FROM wp_users
      WHERE user_email LIKE '[[SPAM_PATTERN]]'
    ) AND status = 'pending';

    Second, delete pending subscriptions:

    // MemberPress Fraudulent User Cleanup - Delete Pending Subscriptions
    // Replace [[SPAM_PATTERN]] with the actual spam email pattern
    DELETE FROM wp_mepr_subscriptions
    WHERE user_id IN (
      SELECT ID
      FROM wp_users
      WHERE user_email LIKE '[[SPAM_PATTERN]]'
    ) AND status = 'pending';

    8. Execute each query separately and check the number of affected rows.

    9. Verify that legitimate user data remains intact.

    2) Issue: Query Execution Errors

    Database permission issues or syntax errors may prevent query execution.

    How to Test/Fix:

    1. Ensure you have proper database privileges to execute DELETE statements.

    2. Double-check table prefixes (replace wp_ with your actual table prefix if different).

    3. Test the SELECT portion first to preview affected records:

    // Test query to count affected records before deletion
    SELECT COUNT(*) FROM wp_mepr_transactions
    WHERE user_id IN (
      SELECT ID
      FROM wp_users
      WHERE user_email LIKE '[[SPAM_PATTERN]]'
    ) AND status = 'pending';

    3) Issue: Accidental Deletion of Legitimate Data

    Risk of removing legitimate user data if patterns are too broad.

    How to Test/Fix:

    1. Always run a test SELECT query first to preview which records will be affected.

    2. Use more specific patterns to avoid catching legitimate users.

    3. Consider manually reviewing suspicious accounts before bulk deletion.

    4. If legitimate data is accidentally deleted, restore from the backup created in step 1.

    Pattern Examples

    Common spam email patterns and how to target them:

    • For emails containing “bot”: %bot%;
    • For specific domain: %@fraudulentdomain.com;
    • For specific prefix: spam_%;
    • For random number patterns: %123@%;

    This solution only affects pending transactions and subscriptions. Active or completed transactions are preserved to maintain member data integrity.

    Alternative Approaches

    • For small numbers of fraudulent users, manual deletion through WordPress Dashboard > Users may be safer;
    • Consider implementing better registration validation to prevent future spam registrations;
    • Use plugins like reCAPTCHA or email verification to reduce fraudulent registrations;
    • Set up automated monitoring for unusual registration patterns;

    Public Facing Documentation / Additional References

    Public Facing Documentation

    Developer Documentation