Author: Predrag

  • Add Country and Currency Codes in MemberPress General Settings

    Summary

    This article explains how to manually add country and currency codes in the MemberPress > Settings > General section using custom code. This is useful when a customer needs a country or currency not yet officially supported by MemberPress.

    It provides a temporary workaround that can be used until the desired codes are added in a future plugin release. 

    The purpose of this is to allow the country and currency codes to show. The payment provider must still be able to take payments from the country and accept this currency.

    Troubleshooting

    Missing Currency or Country Code Options

    When MemberPress doesn’t include a specific currency symbol or country code that a customer needs, this can prevent proper site configuration and payment processing setup.

    1) Issue: Required Currency Symbol Missing from Dropdown

    The currency symbol needed by the customer is not available in the Dashboard > MemberPress > Settings > General dropdown menu.

    Requirements:

    • A child theme or the WPCode plugin;
    • Access to the WordPress backend;
    • The desired currency symbol and country code to insert;

    How to Test/Fix:

    1. Navigate to Dashboard > WPCode > Code Snippets, or open your child theme’s functions.php file.

    2. Click Add New and then click Use Snippet under “Add Your Custom Code (New Snippet)”.

    3. Add a title for your snippet (e.g., “Add Custom Currency Symbol”).

    4. Paste the following code snippet:

    // MemberPress Custom Currency Symbol
    // Replace '৳' with your desired currency symbol
    function mepr_currency_symbols($codes) {
      $new_code = array('[[CURRENCY_SYMBOL]]'); // Replace with actual symbol
      array_splice( $codes, 4, 0, $new_code ); // Adjust 4 to control position in dropdown
      return $codes;
    }
    add_filter('mepr-currency-symbols', 'mepr_currency_symbols');

    5. Replace [[CURRENCY_SYMBOL]] with your actual currency symbol (e.g., ‘৳’, ‘¤’, etc.).

    6. Adjust the number 4 in the array_splice function to control where the symbol appears in the dropdown.

    7. Set Code Type to PHP Snippet and Location to Run Everywhere.

    8. Click Save Snippet and toggle the switch to Active.

    2) Issue: Required Currency Code Missing from Dropdown

    The currency code (like BDT, INR, etc.) needed by the customer is not available in the MemberPress General Settings.

    How to Test/Fix:

    1. In the same WPCode snippet or in your child theme’s functions.php file, add the following code:

    // MemberPress Custom Currency Code
    // Replace 'BDT' with your desired currency code
    function mepr_currency_codes($codes) {
      $new_code = array('[[CURRENCY_CODE]]'); // Replace with actual code (e.g., BDT, INR)
      array_splice( $codes, 4, 0, $new_code );
      return $codes;
    }
    add_filter('mepr-currency-codes', 'mepr_currency_codes');

    2. Replace [[CURRENCY_CODE]] (as shown in the code example above) with your actual ISO 4217 currency code (e.g., ‘BDT’, ‘INR’, ‘ZAR’).

    3. Save and activate the snippet.

    4. Navigate to Dashboard > MemberPress > Settings > General to verify the new options appear in the dropdown menus.

    3) Issue: Code Snippet Not Working

    The custom currency code or symbol doesn’t appear in the MemberPress General Settings after adding the code.

    How to Test/Fix:

    1. Verify the code syntax is correct and there are no PHP errors.

    2. Check that WPCode shows the snippet as Active.

    3. Clear any caching plugins and refresh the MemberPress Settings page.

    4. Verify the filter hook names match exactly: ‘mepr-currency-symbols’ and ‘mepr-currency-codes’.

    5. If using a child theme, ensure the functions.php file has proper opening and closing PHP tags.

    Code Example with Visual Results

    Here’s a complete example using Bangladeshi Taka:

    // Complete example: Adding Bangladeshi Taka (BDT) support
    function mepr_currency_symbols($codes) {
      $new_code = array('৳'); // Bangladeshi Taka symbol
      array_splice( $codes, 4, 0, $new_code );
      return $codes;
    }
    add_filter('mepr-currency-symbols', 'mepr_currency_symbols');
    
    function mepr_currency_codes($codes) {
      $new_code = array('BDT'); // Bangladeshi Taka code
      array_splice( $codes, 4, 0, $new_code );
      return $codes;
    }
    add_filter('mepr-currency-codes', 'mepr_currency_codes');

    After adding this code, both the ৳ symbol and BDT code will appear in the respective dropdown menus in Dashboard > MemberPress > Settings > General.

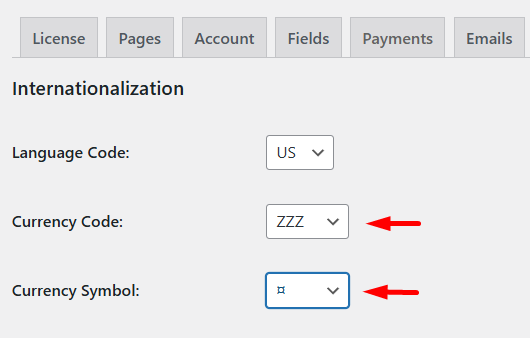
    For this example, ZZZ was used for the Currency Code and ¤ for the Currency Symbol.

    Payment Gateway Compatibility: Ensure your payment gateway supports the currency you’re adding.
    Temporary Solution: This is a workaround until official support is added to MemberPress.
    Updates: The code may need to be re-applied after major MemberPress updates.
    Testing: Always test payment processing with the new currency in a staging environment first.

    Public Facing Documentation / Additional References

    Public Facing Documentation

    Developer Documentation

  • How to Restart a Stripe Subscription in MemberPress

    Summary

    This document covers how to handle user requests to revert to a previous MemberPress plan after making a subscription change. This scenario commonly occurs when users upgrade or downgrade their subscription but later decide the change does not meet their needs.

    The key consideration is ensuring users understand any feature limitations when reverting to a previous plan.

    Troubleshooting

    User Wants to Revert to Previous Plan After Plan Change

    When a user requests to return to their previous MemberPress plan after making a subscription change, the primary focus should be on plan feature comparison and user education.

    1) Issue: User Changed Plan But Wants Previous Plan Back

    This typically happens when users upgrade but realize they do not need the additional features, downgrade but discover they need features from the higher plan, or made an accidental plan change.

    How to Test/Fix:

    1. Navigate to Dashboard > MemberPress > Members.
    2. Locate the user’s member record and click Edit.
    3. Review their Membership History to identify the previous plan.
    4. Check the Subscriptions section to see the current active membership.
    5. Note the previous plan name and features for comparison.

    2) Issue: Feature Limitations in Previous Plan

    When reverting to a previous plan, users may lose access to certain features that were available in their current plan.

    How to Test/Fix:

    1. Review the current plan features versus the requested previous plan features.
    2. Create a list of features that will be removed with the plan change.
    3. Use this communication approach: “Your previous [[PLAN_NAME]] plan includes these features: [[LIST_OF_INCLUDED_FEATURES]]. Please note that by switching back, you will lose access to: [[FEATURES_BEING_REMOVED]]. Please confirm you understand these limitations before proceeding.”
    4. Direct the user to review the MemberPress Pricing page to understand plan features and ensure the previous plan includes all the features they need.
    5. If critical features will be lost, recommend keeping the current plan and provide guidance on utilizing the current plan features effectively.

    Important: Always recommend that users review the full list of features and functionality in the MemberPress plans before confirming any plan changes to ensure the target plan meets their needs.

    3) Issue: User Needs Guidance on Plan Selection

    Some users may be uncertain about which plan best fits their needs.

    How to Test/Fix:

    1. Ask the user to describe their specific use case and requirements.
    2. Compare their needs against the feature sets of available plans.
    3. Provide guidance based on their actual usage requirements rather than plan names.
    4. Reference the MemberPress Pricing page to show feature differences between plans.
    5. Recommend they review the documentation for specific features they need before making the final decision.

    Public Facing Documentation

    Developer Documentation

  • How MemberPress Calculates Proration for Subscription Changes

    Summary

    When members upgrade, downgrade, or switch between subscriptions in MemberPress, the system automatically calculates proration to ensure fair billing. This process determines either a charge for the difference or extends the membership period based on the remaining value of the current subscription versus the cost of the new subscription.

    This article explains the specific formulas MemberPress uses for different subscription change scenarios and covers important limitations and edge cases that affect proration calculations.

    Troubleshooting

    Understanding Proration Calculation Methods

    MemberPress uses different calculation methods depending on the type of subscription change being made. The system always compares the remaining value of the current subscription against the cost of the new subscription for the same time period.

    1) Issue: Recurring to Recurring Subscription Changes

    When a member switches from one recurring subscription to another, MemberPress calculates the daily value of both subscriptions and determines the difference.

    How to Calculate:

    The system uses this formula:

    $new_days_left = $old_days_left (or $new_period if Reset billing period is enabled)
    $old_per_day_amount = $old_amount / $old_period
    $new_per_day_amount = $new_amount / $new_period
    $old_outstanding_amount = $old_per_day_amount * $old_days_left
    $new_outstanding_amount = $new_per_day_amount * $new_days_left
    $proration = $new_outstanding_amount - $old_outstanding_amount
    $days = $new_days_left

    If $proration is positive, the member pays this amount for the calculated number of days. If negative, the member receives extended days (free proration).

    2) Issue: Recurring to Lifetime Subscription Changes

    When switching from a recurring subscription to a lifetime membership, the calculation considers the remaining value of the recurring subscription against the full lifetime price.

    How to Calculate:

    The system uses this formula:

    $old_outstanding_amount = ($old_amount / $old_period) * $old_days_left
    $proration = $new_amount - $old_outstanding_amount
    $days = 0

    If $proration is positive, the member pays this amount. If negative or zero, no additional payment is required.

    3) Issue: Lifetime to Recurring Subscription Changes

    When downgrading from a lifetime membership to a recurring subscription, the system compares the full lifetime amount against the new recurring subscription price.

    How to Calculate:

    The system uses this formula:

    $proration = $new_amount - $old_amount
    $days = $new_period

    If $proration is positive, the member pays this amount for the new recurring period. If negative, the first recurring period is free.

    4) Issue: Lifetime to Lifetime Subscription Changes

    When switching between two lifetime memberships, the calculation is straightforward price comparison.

    How to Calculate:

    The system uses this formula:

    $proration = $new_amount - $old_amount
    $days = 0

    If $proration is positive, the member pays the difference. If negative or zero, no additional payment is required.

    Important Proration Limitations and Rules

    5) Issue: Minimum Charge Requirements

    MemberPress enforces a minimum charge when proration amounts are very small but still positive.

    If proration is less than $1 but greater than $0, MemberPress automatically charges $1 minimum. This prevents processing fees from exceeding the actual charge amount.

    6) Issue: Non-Recurring Subscriptions With Expiry Dates

    Subscriptions that are non-recurring but have expiry dates are handled using special logic.

    Non-recurring subscriptions with expiry dates are treated like recurring subscriptions for proration calculation purposes. The system calculates daily values based on the subscription period.

    7) Issue: Free Trials and Tax Considerations

    Free trials and taxes have specific handling in proration calculations.

    The following rules apply:

    • Free trials with no payment are not included in proration calculations;
    • Taxes are not included in the proration calculation formulas;
    • Maximum extended days are capped at 365 days regardless of calculation results;

    Public Facing Documentation / Additional References

    Public Facing Documentation

    Developer Documentation

  • Enable Next Button After Completing Video for Lessons

    Summary

    This document explains how to prevent users from skipping ahead in a course by disabling the Next button until the lesson video has been fully watched. This applies to lessons created with MemberPress Courses and videos embedded using the Presto Player plugin.

    The solution utilizes a custom PHP snippet that disables the Next button on lesson pages until the video has ended. This ensures structured course navigation and complete content engagement before allowing progression to subsequent lessons.

    Troubleshooting

    Users Can Skip Video Content Without Watching

    When students access course lessons, they may be able to click the Next button immediately without watching the embedded video content. This can result in incomplete learning experiences and reduced course effectiveness.

    1) Issue: Next Button is Always Enabled

    By default, MemberPress Courses allows users to navigate between lessons freely without any video completion requirements.

    How to Test/Fix:

    1. Navigate to Dashboard > Plugins > Add New.
    2. Search for Presto Player.
    3. Click Install Now, then Activate.
    4. Ensure Autoplay is disabled in Presto Player settings.
    5. Add the custom code snippet provided below.

    2) Issue: Video Completion Not Detected

    The system may not properly detect when a video has finished playing, preventing the Next button from becoming enabled.

    How to Test/Fix:

    Verify that Presto Player is properly configured:

    1. Navigate to Dashboard > Presto Player > Settings.
    2. Confirm Autoplay is set to Off.
    3. Test video playback to ensure the ended event fires correctly.
    4. Check the browser console for any JavaScript errors.

    Implementation Steps

    Step 1: Install Required Plugin

    1. Navigate to Dashboard > Plugins > Add New.
    2. Search for Presto Player.
    3. Click Install Now.
    4. Click Activate once installation completes.

    Step 2: Configure Presto Player Settings

    1. Navigate to Dashboard > Presto Player > Settings.
    2. Locate the Autoplay setting.
    3. Set Autoplay to Off.
    4. Click Save Changes.

    Step 3: Add Custom Code Snippet

    Choose one of the following methods to implement the code:

    Method A: Using WPCode Plugin (Recommended)

    1. Navigate to Dashboard > Code Snippets.
    2. Click Add New Snippet.
    3. Select Add Your Custom Code (New Snippet).
    4. Set the code type to PHP Snippet.
    5. Add the following code:
    add_action('wp_footer', function() {
    ?>
    <script>
    (function($) {
        $(document).ready(function() {
            var nextButton = $('#mpcs-classroom-next-lesson-link');
            
            // Make sure it's a Lesson
            if ( $('body').hasClass('single-mpcs-lesson') ) {
                $(nextButton).prop('disabled', true);
            }
            
            // Sent when playback completes. Note: This does not fire if autoplay is true.
            wp.hooks.addAction("presto.playerEnded", "mpcs-courses", (player) => {
                $(nextButton).prop('disabled', false);
            });
        });
    })(jQuery);
    </script>
    <?php
    });
    1. Set the snippet to Active.
    2. Click Save Snippet.

    Method B: Using Theme Functions File

    1. Navigate to Appearance > Theme Editor.
    2. Select functions.php from the file list.
    3. Add the code snippet at the end of the file.
    4. Click Update File.

    Step 4: Test Implementation

    1. Create a test lesson with an embedded Presto Player video.
    2. Access the lesson as a student user.
    3. Verify the Next button is disabled initially.
    4. Play the video completely.
    5. Confirm that the Next button becomes enabled after video completion.

    Important Notes
    The video completion hook only triggers when autoplay is disabled in Presto Player settings.
    Users must manually start video playback for the completion event to fire properly.
    If students refresh the page or navigate away and return, they will need to watch the video again to enable the Next button.
    This solution specifically works with Presto Player and may not function with other video players or embedded content.

    Public Facing Documentation / Additional References

    Public Facing Documentation

    Developer Documentation

  • How to Restart a Stripe Subscription From MemberPress After Cancellation

    Summary

    This document explains how to restart a Stripe subscription in MemberPress after it has been cancelled by either the customer or admin. This process allows members to resume their subscription without creating a new one, maintaining their existing membership history and settings.

    Important: This procedure only works for subscriptions that are not expired (the Active column shows a green Yes). PayPal subscriptions cannot be restarted once cancelled.

    Troubleshooting

    Customer Wants to Resume Cancelled Subscription

    When a customer cancels their subscription and later wants to reactivate it, you can restart the subscription directly from the MemberPress admin area instead of requiring them to purchase it again.

    Prerequisites:

    • The subscription must still be active (Active column shows green Yes);
    • The subscription must be processed through Stripe (not PayPal or other built-in gateway);
    • Admin access to MemberPress dashboard.

    1) Issue: Subscription Status Needs Manual Adjustment

    The cancelled subscription requires status changes before it can be resumed through the MemberPress interface.

    How to Test/Fix:

    1. Navigate to Dashboard > MemberPress > Subscriptions.
    2. Locate the cancelled subscription in the subscription list.
    3. In the Auto Rebill column for that subscription, change the status from Stopped to Paused.
    4. Click Save to save the changes.
    5. Refresh the page in your browser.
    6. Hover your mouse pointer over the same subscription row. A Resume link should now appear.
    7. Click the Resume link and wait a few seconds for the process to complete.
    8. Verify that the Auto Rebill column status has changed to Enabled.

    2) Issue: PayPal Subscriptions Cannot Be Restarted

    PayPal subscriptions, once cancelled, cannot be restarted using this method due to PayPal’s API limitations.

    How to Test/Fix: Direct the customer to sign up for a new subscription through your membership registration page. The previous subscription history will remain in their account for reference.

    This procedure only works for Stripe subscriptions that have not yet expired. The subscription must show a green “Yes” in the Active column. Expired subscriptions will need to be handled through the standard renewal process or by creating a new subscription.

    Public Facing Documentation / Additional References

    Public Facing Documentation

    Developer Documentation

  • How to Extract Members With Active Subscriptions Using Database Query

    Summary

    This document provides a database query to extract all members who currently have active subscriptions on your MemberPress site. This is useful for creating member lists, analyzing subscription data, or exporting active subscriber information for marketing purposes.

    The query retrieves user information along with their subscription details, including transaction ID, user ID, username, product ID, status, total amount, and expiration date.

    How to Use the Database Query

    Database Query for Active Subscriptions

    1. Access Your Database

    You can run this query using any of the following methods:

    • phpMyAdmin (most common method);
    • cPanel Database interface;
    • MySQL command line;
    • Database management plugin (like Adminer);

    2. Execute the Query

    Run the following SQL query in your database management tool:

    SQL Query – Extract Active MemberPress Subscriptions

    SELECT t.id, t.user_id, u.user_login, t.product_id, t.status, t.total, t.expires_at
    FROM wp_mepr_transactions AS t
    JOIN wp_users AS u ON t.user_id = u.ID
    WHERE t.status in ('complete', 'confirmed') AND (t.expires_at > now() OR t.expires_at = '0000-00-00 00:00:00')
    ORDER BY u.ID;

    3. Understanding the Query Results

    The query returns the following columns:

    • id – Transaction ID;
    • user_id – WordPress user ID;
    • user_login – Username;
    • product_id – MemberPress product/membership ID;
    • status – Transaction status (complete or confirmed);
    • total – Amount paid;
    • expires_at – Subscription expiration date;

    Important Considerations

    Multiple Rows Per User: The query may return multiple rows for some users because they have multiple active subscriptions. This is normal behavior when users have subscriptions to different products or recurring subscriptions.

    Handling Multiple Subscriptions

    If you need to get unique users only (one row per user), you can modify the query to group results:

    SQL Query – Unique Users with Active Subscriptions

    SELECT DISTINCT t.user_id, u.user_login, COUNT(t.id) as active_subscriptions
    FROM wp_mepr_transactions AS t
    JOIN wp_users AS u ON t.user_id = u.ID
    WHERE t.status in ('complete', 'confirmed') AND (t.expires_at > now() OR t.expires_at = '0000-00-00 00:00:00')
    GROUP BY t.user_id, u.user_login
    ORDER BY u.ID;

    Database Table Prefix

    The query uses the standard WordPress table prefix wp_. If your site uses a different table prefix, update the query accordingly:

    • Replace wp_mepr_transactions with [[YOUR_PREFIX]]_mepr_transactions;
    • Replace wp_users with [[YOUR_PREFIX]]_users;

    Public Facing Documentation / Additional References

    MemberPress Documentation

    WordPress Documentation

    Additional Resources