When unauthorized users attempt to download a protected file in MemberPress, they are redirected to the login page by default. This behavior differs from how MemberPress handles protected pages and posts, where unauthorized content can be replaced with a custom message inline.
This happens because file access is handled at the server level rather than through WordPress page rendering. MemberPress cannot override the file itself with a custom message, so a redirect is the only way to block access. If the global “Redirect unauthorized visitors to a specific URL” option is not enabled under MemberPress > Settings > Pages tab, the redirect defaults to the login page.
This document explains the difference between page/post and file protection, and provides a custom code solution to redirect unauthorized file download attempts to a custom page without affecting the global unauthorized redirect setting.
Troubleshooting
Understanding Page/Post Protection vs. File Protection
Pages/Posts Protection: MemberPress hooks into the the_content() function that WordPress uses to display page and post content. This allows MemberPress to override the content of the page and display a custom unauthorized message directly to unauthorized users. The message appears inline, and the visitor stays on the page URL without being redirected.
File Protection: File access is handled separately from page content. Files are served outside of the normal WordPress page rendering process. When someone clicks a protected file link, there is no page template to render a message on. MemberPress blocks access at the file level and redirects the user instead. By default, this redirect goes to the login page.
Note: This is expected behavior by design. File downloads cannot display inline unauthorized messages because there is no page content to replace — the redirect ensures the file stays secure.
1) Unauthorized File Download Redirects to Login Page Instead of a Custom Page
When unauthorized users click a protected file download link, they are redirected to the MemberPress login page. The global unauthorized redirect setting under MemberPress > Settings > Pages tab can change this behavior, but enabling it affects all protected content sitewide — not just file downloads.
If you want to redirect only file download attempts to a custom page while leaving other protection rules unaffected, you can use a code snippet that hooks into the mepr_rule_redirect_unauthorized filter.
How to Test/Fix:
Add custom code that filters the unauthorized redirect URL specifically for protected file downloads. This can be implemented using either the WPCode plugin or a child theme functions.php file.
Option 1: Using WPCode Plugin (Recommended)
Navigate to Dashboard > Code Snippets > + Add Snippet.
Click Add Your Custom Code (New Snippet).
Enter a name for the snippet: “Custom Unauthorized File Download Redirect”.
Set Code Type to PHP Snippet.
Paste the code snippet provided below into the code editor.
Navigate to Dashboard > Appearance > Theme File Editor.
Select your child theme from the dropdown.
Click functions.php in the right sidebar.
Add the code snippet at the end of the file.
Click Update File.
Important: Always test code modifications on a staging site before implementing on production. Create a complete backup of your site before making changes to theme files.
Code Snippet:
/**
 * Redirect unauthorized users to a custom page
 * when they attempt to download a protected file.
 * Replace '/unauthorized/' with the slug of your custom page.
 */
add_filter('mepr_rule_redirect_unauthorized', function($redirect_to, $uri) {
    return '/unauthorized/'; // Change this to your custom page slug
}, 10, 2);
Replace /unauthorized/ with the slug of the page you want unauthorized users to see. You can customize this page with any content you need — a login form, pricing information, registration links, or a custom message.
2) Verifying the Redirect Works Correctly
After implementing the code, verify that unauthorized file download attempts are redirected to your custom page.
How to Test/Fix:
Create a test page with the slug used in the code snippet (e.g., /unauthorized/).
Add content to the page so you can visually confirm the redirect is working.
Ensure you have a protected file set up via a MemberPress rule.
Log out of your WordPress site (or use an incognito/private browser window).
Try to access the protected file download URL directly.
Confirm you are redirected to the custom page instead of the default login page.
Log in as a user with the required membership and confirm the file downloads normally.
Note: If the global “Redirect unauthorized visitors to a specific URL” option is enabled under MemberPress > Settings > Pages, it may override or conflict with this snippet for non-file content. This snippet is intended for use when the global redirect option is disabled, so that only file download attempts are affected.
Public Facing Documentation / Additional References
This document addresses a database issue where the refunded_at column is missing from the wp_mepr_transactions table. This missing column can cause manual transactions to return a transaction ID of 0, prevent new signups from being associated with a membership, or result in member accounts not linking to the correct membership.
The refunded_at column was introduced in MemberPress version 1.12.11. Sites that updated from an older version should have received this column automatically during migration. However, on sites using object caching (such as Redis or Memcached) or certain managed hosting environments, this migration may fail silently.
This document provides steps to diagnose the issue, manually add the missing column, and verify the fix.
Troubleshooting
Prerequisites
Access to the site’s database management tool (such as phpMyAdmin or Adminer);
A full database backup created before making any changes.
Symptoms of a Missing refunded_at Column
One or more of the following symptoms may indicate this issue:
Manual transactions return a transaction ID of 0;
New signups are not associated with a membership;
Members can sign up, but their account is not linked to the correct membership;
Transaction creation fails without a visible error on the frontend.
Cause of the Issue
The refunded_at column was added to the wp_mepr_transactions table in MemberPress version 1.12.11. When a site updates from a version older than 1.12.11, MemberPress runs a database migration to add this column automatically.
This migration may fail on sites that use object caching (such as Redis or Memcached). Managed hosting platforms with strict database write restrictions (such as WP Engine) can also prevent the migration from completing. When the column is absent, any attempt to create or update a transaction will fail.
Diagnosing the Issue
Confirming the Column Is Missing
Log in to the WordPress hosting environment.
Open the database management tool (such as phpMyAdmin).
Locate the wp_mepr_transactions table.
The table prefix may differ from wp_ depending on the WordPress installation. Check the $table_prefix value in the site’s wp-config.php file to confirm the correct prefix.
Click on the wp_mepr_transactions table to view its structure.
Check whether a refunded_at column exists in the table.
If the refunded_at column is not listed, proceed to the fix below.
Adding the Missing refunded_at Column
Before running any database queries, perform a full database backup. Confirm the backup can be restored if needed. Incorrect SQL queries can cause data loss or site downtime. The hosting provider can run this query on behalf of the site owner if needed.
Open the database management tool (such as phpMyAdmin).
Navigate to the SQL tab or query editor.
Run the following SQL query to add the missing column and index.
-- MemberPress: Add missing refunded_at column to transactions table -- Adjust the table prefix if the site does not use the default wp_ prefix
If the site uses a custom table prefix, replace wp_ with the correct prefix in the query above. For example, if the prefix is wpm_, the table name would be wpm_mepr_transactions.
Execute the query.
Confirm the query completes without errors.
Verify the refunded_at column now appears in the table structure.
Verifying the Fix
Testing New Member Signups
Navigate to the site’s registration or pricing page.
Complete a test signup using a test membership.
Navigate to Dashboard > MemberPress > Transactions.
Confirm that a new transaction appears with a valid transaction ID (not 0).
Confirm the transaction is associated with the correct membership.
Testing Manual Transaction Creation
Navigate to Dashboard > MemberPress > Transactions.
Click Add New to create a manual transaction.
Fill in the required fields and click Save.
Confirm the transaction saves with a valid transaction ID.
The refunded_at Column Exists but the Issue Persists
If the refunded_at column already exists and transaction issues continue, the cause may be unrelated to the missing column. The following are common alternative causes.
Plugin Conflict Interrupting the Signup Process
Security plugins that enforce strong password policies can interrupt the MemberPress registration flow. Plugins that redirect users immediately after signup may also prevent the transaction from completing.
How to Test/Fix:
Create a staging environment for the site.
Deactivate all plugins except MemberPress on the staging site.
Attempt a test signup or manual transaction.
If the issue resolves, reactivate plugins one at a time to identify the conflicting plugin.
Once identified, check the conflicting plugin’s settings for options that may interfere with registration or redirects.
Caching Serving Stale Data
Object caching or page caching may serve outdated data after the database fix is applied. This can make the issue appear unresolved even after the column has been added.
How to Test/Fix:
Clear the site’s object cache (Redis, Memcached, or the hosting platform’s cache).
Clear any page caching plugin cache (such as WP Super Cache, W3 Total Cache, or LiteSpeed Cache).
Clear the browser cache or test in an incognito/private browsing window.
MemberPress allows site owners to set default values for custom registration fields. However, this option is not available for standard address fields such as State and Country. This is a known limitation, and there is no built-in setting to pre-fill these fields.
This document explains the limitation and provides a JavaScript workaround. The workaround pre-fills the State and Country fields on MemberPress signup forms. This is useful for sites where all members are located in a single region.
Troubleshooting
Standard Address Fields Cannot Be Pre-Filled via MemberPress Settings
MemberPress includes built-in standard fields for registration forms. These fields include First Name, Last Name, Address, City, State, Country, and Zip. The Default Value setting is only available for custom registration fields. Standard fields do not expose this option in the admin UI.
MemberPress Does Not Provide a Default Value Option for Standard Fields
The Default Value option is only shown for custom fields. These are the fields created under Dashboard > MemberPress > Settings > Fields. Standard fields are built into MemberPress and do not include this setting. There is no way to assign a default value to these fields within the MemberPress admin.
How to Test/Fix:
Navigate to Dashboard > MemberPress > Settings and click the Fields tab.
Create or edit a custom field and note the “Default Value” option.
Scroll to the standard fields listed above the custom fields section.
Observe that the standard fields do not include the “Default Value” option.
This confirms the limitation is by design and not a misconfiguration.
No Built-In Workaround Exists Within MemberPress
Third-party form plugins or automation tools are sometimes suggested as alternatives. However, these solutions add complexity. They may not reliably pre-fill native MemberPress registration fields. A simpler approach is to use a JavaScript snippet.
JavaScript Workaround Using WPCode
The following JavaScript snippet pre-fills the Country and State fields when the registration form loads. Members can still change the values manually before submitting the form.
Prerequisites
The WPCode plugin (free version) installed and activated;
Access to the WordPress admin dashboard;
At least one MemberPress membership with address fields enabled on the registration form.
Adding the Snippet
Install and activate the WPCode plugin from the WordPress plugin repository.
Navigate to Dashboard > Code Snippets.
Click “Add Your Custom Code (New Snippet)” and choose “JavaScript Snippet” as the code type.
Enter a descriptive title, such as “MemberPress – Default State and Country”.
Paste the following code into the code editor:
// MemberPress - Set Default Country and State on Signup Form
// Change 'US' on line 4 to the two-letter ISO code for another country.
// Change 'TX' on line 6 to the two-letter abbreviation for another state.
(function($) {
  $(document).ready(function() {
    $('#mepr_signup_form #mepr-address-country').val('US').change();
    $('#mepr_signup_form #mepr-address-state').val('TX').change();
  });
})(jQuery);
How the Snippet Works
This snippet targets the MemberPress signup form using jQuery. It sets the Country dropdown to “US” (United States) and the State dropdown to “TX” (Texas) when the page loads. The .change() method triggers the dropdown’s change event. This ensures that the State dropdown updates correctly after the Country value is set.
Modifying Default Values
To use different default values, modify the snippet as follows:
To change the country, replace “US” on line 6 of the code with the desired two-letter ISO country code (e.g., “CA” for Canada, “GB” for the United Kingdom);
To change the state, replace “TX” on line 7 of the code with the desired two-letter state or region abbreviation (e.g., “CA” for California, “NY” for New York).
Click “Save Snippet” and toggle the snippet status to “Active”.
Open a MemberPress registration page in a new browser tab.
Verify that the Country field displays the expected default value.
Verify that the State field displays the expected default value.
Confirm that both fields can still be changed manually.
Submit a test registration to confirm the selected values are saved correctly.
Known Limitations
This snippet applies to all MemberPress signup forms across the site. If different membership levels require different default values, the snippet must be modified with additional conditional logic to target specific pages or forms.
The snippet only sets default values for the Country and State dropdowns. Other standard address fields (Address, City, Zip) are text inputs that remain blank by default;
If a caching plugin is active, the cached version of the page may not reflect the changes immediately. Clear the site cache after activating the snippet;
The snippet depends on jQuery, which is loaded by default in WordPress. If a theme or plugin dequeues jQuery, the snippet will not work;
This workaround applies to the frontend registration form only. It does not affect the admin-side user profile fields.
Public Facing Documentation / Additional References
When payments processed through Stripe do not register in MemberPress, the cause is often a webhook delivery failure. In these cases, the payment exists in Stripe but the corresponding transaction is missing from MemberPress.
This document explains how to resend Stripe payment webhooks from the Stripe Dashboard. Resending a webhook triggers MemberPress to process and record the missing transaction. This process should only be performed after the underlying webhook delivery issue has been resolved.
Troubleshooting
Common Causes of Missing Transactions
Stripe sends webhook notifications to MemberPress when payments succeed. If the webhook cannot reach the site, MemberPress will not record the transaction. Common causes include:
The site was temporarily down or unreachable when Stripe sent the webhook;
A security plugin, firewall, or server rule blocked the incoming webhook request;
A server timeout occurred before MemberPress could finish processing the webhook;
Caching or CDN rules interfered with the webhook endpoint.
Resolve the root cause of the webhook failure before resending any payments. If the original issue persists, resent webhooks will also fail.
Prerequisites
Before resending webhooks, confirm the following:
The MemberPress Stripe webhook URL is correctly configured. Navigate to Dashboard > MemberPress > Settings > Payments tab and verify the webhook URL shown under the Stripe gateway settings.
The webhook endpoint is reachable. Check the Stripe Dashboard > Developers > Webhooks section to confirm the endpoint status is active and recent deliveries are succeeding.
The root cause of the original delivery failure has been identified and resolved.
Resending a Stripe Payment Webhook
Follow these steps to resend a payment webhook from the Stripe Dashboard to MemberPress.
Locate the Payment in Stripe
Log in to the Stripe Dashboard.
Navigate to Stripe Dashboard > Payments at https://dashboard.stripe.com/payments.
Locate the payment that needs to be resent.
Click on the payment to open the payment detail view.
Find the Payment Event
Scroll down to the Events section within the payment detail view.
Locate the event that reads similar to: “The payment pi_3SlD5aH46pO6dg1e1G5VHK3T for $17.00 has succeeded.” The pi_xxxxxxxxxx value and dollar amount will be unique to each transaction.
Click on the payment_intent.succeeded event.
Resend the Webhook
A window will appear showing the webhooks registered for the event. The MemberPress webhook endpoint will be listed on the right side, identified by the site URL.
Click the Resend button next to the site webhook endpoint.
Stripe will resend the payment notification to MemberPress.
MemberPress will then process and record the transaction.
Repeat these steps for each payment that needs to be resent. This process must be completed one payment at a time. Stripe does not provide a bulk resend option.
Verifying the Transaction in MemberPress
After resending the webhook, confirm that MemberPress has recorded the transaction.
Navigate to Dashboard > MemberPress > Transactions.
Search for the transaction by the member’s name or email address.
Verify that a new transaction entry exists with the correct amount, date, and status.
If the transaction does not appear, check the Stripe Dashboard > Developers > Webhooks section for delivery errors on the resent event.
Known Limitations
Stripe does not provide a way to replay historical events to new webhook endpoints. If the original webhook endpoint has been deleted and a new one created, past events cannot be resent to the new endpoint;
Payments can only be resent one at a time. There is no bulk resend feature in the Stripe Dashboard;
Resending a webhook for a payment that MemberPress has already recorded may create a duplicate transaction. Always verify that the transaction is missing in MemberPress before resending.
Do not resend webhooks for payments that are already recorded in MemberPress. Doing so may result in duplicate transactions and incorrect member access records
Public Facing Documentation / Additional References
The Autoptimize plugin can conflict with the MemberPress ReadyLaunch account page. This conflict causes certain interactive buttons to become unresponsive for non-admin users. Affected buttons include the three-dot Actions menu on the Subscriptions tab and the hamburger menu on account pages.
This document explains the cause of the conflict and provides the steps to resolve it. The fix involves excluding specific MemberPress JavaScript files from Autoptimize’s optimization process.
Troubleshooting
Cause of the Conflict
Autoptimize aggregates and minifies JavaScript files to improve page load speed. During this process, it can alter the load order or break the functionality of MemberPress ReadyLaunch scripts. The ReadyLaunch account page relies on specific JavaScript files to handle interactive elements. These include the Actions dropdown (powered by Popper.js) and the mobile hamburger menu.
Admin users may not experience this issue. WordPress loads additional scripts for administrators that can mask the conflict. Non-admin users (regular members) rely solely on the ReadyLaunch scripts, making the problem visible only for them.
Symptoms
The following symptoms indicate this conflict is present:
The three-dot Actions menu on the Subscriptions tab does not produce a dropdown when clicked;
The hamburger menu on the account page does not open;
The issue affects non-admin users only;
The issue persists across multiple browsers and devices.
Resolving the Conflict
Account Page Buttons Unresponsive for Non-Admin Users
The ReadyLaunch account page buttons stop responding when Autoptimize processes the MemberPress JavaScript files. Excluding these files from optimization restores the button functionality.
How to Test/Fix:
Navigate to Dashboard > Settings > Autoptimize.
Click the JS, CSS & HTML tab.
Scroll down to the “Exclude scripts from Autoptimize” field under the JavaScript Options section.
Add the following file paths to the exclusion field, separated by commas:
If the “Exclude scripts from Autoptimize” field already contains other exclusions, add a comma after the last existing entry before adding the MemberPress paths.
Click Save Changes and Empty Cache.
Verifying the Fix
How to Test/Fix:
Log out of the WordPress admin area.
Log in as a non-admin member (or use an incognito window with a test member account).
Click the three-dot Actions menu on any active subscription. The dropdown should now appear.
Test the hamburger menu if viewing on a mobile device or narrow screen. The menu should open and close as expected.
If the site uses an additional caching plugin or server-side caching, clear all caches after saving the Autoptimize settings. The changes may not take effect until all cache layers are purged. For guidance, refer to the documentation on setting up popular caching plugins with MemberPress.
Explanation of Excluded Scripts
The three JavaScript files excluded from Autoptimize serve the following purposes:
/wp-content/plugins/memberpress/js/vendor/popper.min.js — Handles dropdown positioning for the Actions menu on the Subscriptions tab;
/wp-content/plugins/memberpress/js/readylaunch/account.js — Controls account page interactive elements, including tab switching and the Actions dropdown;
/wp-content/plugins/memberpress/js/readylaunch/general.js — Manages general ReadyLaunch functionality, including the hamburger menu.
Excluding these files from Autoptimize does not affect site performance in a measurable way. These are small scripts that load only on MemberPress account pages.
Known Limitations
This solution applies specifically to the Autoptimize plugin. Other JavaScript optimization plugins (e.g., WP Rocket, LiteSpeed Cache) have different exclusion methods;
If the MemberPress plugin is installed in a non-standard directory, the file paths will differ from those listed above;
Future MemberPress updates may change the ReadyLaunch file structure. If the issue reappears after an update, verify that the excluded file paths are still correct.
Public Facing Documentation / Additional References
By default, the MemberPress Corporate Accounts add-on displays only basic fields on the manual “Add Sub Account” form. When an account owner or administrator adds a sub-account through the Manage Sub Accounts page, custom fields associated with the membership are not rendered.
This document provides a custom PHP code snippet that forces MemberPress custom fields to display on the “Add Sub Account” form. The snippet also ensures that data entered into these fields is saved to the sub-account user’s profile upon creation.
Troubleshooting
Prerequisites
To use the solution provided in this document, the following is required:
Custom fields configured for the relevant memberships (via Dashboard > MemberPress > Settings, and click the Fields tab).
This snippet will not render file upload fields. The “Add Sub Account” form does not support multipart data required for file uploads.
Custom Fields Not Appearing on the “Add Sub Account” Form
The Corporate Accounts add-on does not include custom field rendering on the “Add Sub Account” form by default. This is expected behavior, not a bug. Corporate account owners and administrators will only see the default name and email fields when manually adding sub-accounts.
The code snippet below hooks into the MemberPress signup field rendering and sub-account creation processes. It renders the membership’s custom fields on the form and saves submitted data to the new user’s profile metadata.
Adding the Custom Code Snippet
To display and save custom fields on the “Add Sub Account” form, add a custom PHP code snippet to the site. The recommended method is using the WPCode plugin.
Install and activate the WPCode plugin on the WordPress site. Alternatively, add the code to the child theme’s functions.php file via FTP/SFTP.
Navigate to Dashboard > Code Snippets > Add Snippet.
Select the “Add Your Custom Code (New Snippet)” option.
Ensure the Code Type is set to “PHP Snippet”.
Copy the code snippet provided below and paste it into the code editor.
Toggle the switch to Active and click the Save Snippet button.
Disclaimer: The provided solution is strictly informational. Custom coding falls outside the scope of official support. Creating, debugging, or modifying custom code for specific setups is not covered. Testing on a staging site or taking a full site backup before applying the code to a live site is strongly recommended.
Custom Fields on Sub Account Form Code Snippet
<?php
/**
 * MemberPress Custom Snippet
 * Displays the membership's custom fields on the Corporate
 * "Add Sub Account" form and saves their values when
 * a sub-account is added.
 */

add_action('mepr-user-signup-fields', function() {
  static $already_rendered = false;

  if ($already_rendered) {
    return;
  }

  if (
    !isset($_REQUEST['action']) ||
    $_REQUEST['action'] !== 'manage_sub_accounts' ||
    !isset($_REQUEST['ca']) ||
    !class_exists('MPCA_Corporate_Account')
  ) {
    return;
  }

  $ca = MPCA_Corporate_Account::find_by_uuid(
    sanitize_text_field($_REQUEST['ca'])
  );

  if (empty($ca->id)) {
    return;
  }

  $product = new MeprProduct($ca->get_obj()->product_id);
  $custom_fields = MeprUsersHelper::get_custom_fields($product);

  if (empty($custom_fields)) {
    return;
  }

  $already_rendered = true;
  $unique_suffix = '-mpca-sub';

  foreach ($custom_fields as $line) {
    if (!$line->show_on_signup || $line->field_type === 'file') {
      continue;
    }

    $required = $line->required ? '*' : '';
    $value = '';

    MeprView::render('checkout/signup_row', get_defined_vars());
  }
});

add_action('mpca_add_sub_account', function($transaction_id, $parent_transaction_id) {
  if (!MeprUtils::is_post_request()) {
    return;
  }

  $txn = new MeprTransaction($transaction_id);

  if (empty($txn->id)) {
    return;
  }

  $user_id = $txn->user_id;
  $product = new MeprProduct($txn->product_id);
  $custom_fields = MeprUsersHelper::get_custom_fields($product);

  if (empty($custom_fields)) {
    return;
  }

  foreach ($custom_fields as $line) {
    if (!$line->show_on_signup || $line->field_type === 'file') {
      continue;
    }

    $field_key = $line->field_key;

    if (isset($_POST[$field_key]) && $_POST[$field_key] !== '') {
      if (
        in_array(
          $line->field_type,
          ['checkboxes', 'multiselect'],
          true
        )
      ) {
        update_user_meta(
          $user_id,
          $field_key,
          array_map(
            'sanitize_text_field',
            array_filter(
              wp_unslash((array) $_POST[$field_key])
            )
          )
        );
      } elseif ($line->field_type === 'textarea') {
        update_user_meta(
          $user_id,
          $field_key,
          wp_kses_post(wp_unslash($_POST[$field_key]))
        );
      } else {
        update_user_meta(
          $user_id,
          $field_key,
          sanitize_text_field(
            wp_unslash($_POST[$field_key])
          )
        );
      }
    } elseif ($line->field_type === 'checkbox') {
      delete_user_meta($user_id, $field_key);
    }
  }
}, 10, 2);
How the Snippet Works
The snippet uses two MemberPress hooks to accomplish its task:
mepr-user-signup-fields action hook — renders the membership’s custom fields on the “Add Sub Account” form. The hook fires during signup field rendering. The snippet checks whether the current request is the Corporate Accounts “manage_sub_accounts” action before rendering fields;
mpca_add_sub_account action hook — saves custom field data to the new sub-account user’s profile metadata after the sub-account is created. Each field type is sanitized appropriately (checkboxes, multiselect, textarea, and standard fields).
The snippet skips any field where “Show on Signup” is disabled in the custom field settings. It also skips file upload fields, as the form does not support multipart data.
Supported Field Types
The following custom field types are supported by this snippet:
Text fields;
Textarea fields;
Select dropdowns;
Multiselect fields;
Checkboxes and checkbox groups;
Radio buttons;
Date fields.
File upload fields are not supported. The “Add Sub Account” form does not include the enctype="multipart/form-data" attribute required for file uploads.
Verifying the Snippet Is Working
Verifying Custom Fields Are Displayed
Log in as a corporate account holder or as an administrator.
Navigate to the Manage Sub Accounts page for a corporate membership.
Click the “Add Sub Account” button.
Confirm that the membership’s custom fields appear beneath the default name and email fields.
Verifying Custom Field Data Is Saved
Fill in the custom fields and submit the “Add Sub Account” form.
Navigate to Dashboard > Users and locate the newly created sub-account user.
Click Edit on the user profile.
Scroll down to the MemberPress Custom Fields section.
Confirm that the custom field data matches the values entered on the form.
Known Limitations
File upload fields are not supported due to the form lacking multipart encoding;
Custom field validation rules defined in MemberPress apply on standard registration forms but may not enforce all validation on this form;
Fields with “Show on Signup” disabled in Dashboard > MemberPress > Settings > Fields tab will not be rendered by this snippet;
The snippet relies on the mepr-user-signup-fields and mpca_add_sub_account hooks. Future MemberPress or Corporate Accounts updates that modify these hooks may require snippet adjustments.
Public Facing Documentation / Additional References
By default, MemberPress displays all custom fields to every registered user. This includes sub-accounts created through the Corporate Accounts add-on. Site owners may need to hide specific fields from sub-accounts on both the signup form and the account page.
The Hide Corporate Fields for MemberPress companion plugin addresses this limitation. It adds a “Show for Sub-account” checkbox to each custom field in the MemberPress settings. Fields with the checkbox unchecked are hidden from sub-accounts, and validation for those hidden fields is suppressed automatically.
This document covers the installation and configuration of the plugin, how to verify the field visibility settings, and how the plugin handles validation for hidden required fields.
Troubleshooting
Cause of the Issue
MemberPress does not include a native way to show or hide individual custom fields based on user type. When the Corporate Accounts add-on is active, sub-accounts see the same custom fields as parent account holders. If any of those fields are marked Required, sub-accounts cannot complete signup or save account changes without filling them in — even when the fields are not relevant to them.
Prerequisites
The following must be active on the site before proceeding:
At least one custom field configured at Dashboard > MemberPress > Settings > Fields.
If either MemberPress or the Corporate Accounts add-on is missing, the plugin will display an admin notice explaining which dependency is required. The plugin will not function until both are active
In the WordPress admin, navigate to Dashboard > Plugins > Add New.
Click Upload Plugin.
Click Choose File, select the downloaded ZIP file, and click Install Now.
Click Activate Plugin.
Alternatively, the plugin folder can be uploaded directly to wp-content/plugins/ on the server via FTP or SFTP, then activated from Dashboard > Plugins.
Configure Field Visibility
Navigate to Dashboard > MemberPress > Settings.
Click the Fields tab.
Locate the Custom User Information Fields section.
Find the “Show for Sub-account” checkbox next to each custom field row.
Set the checkbox for each field:
Checked — Sub-accounts see this field on the signup form and on the account page.
Unchecked — This field is hidden from sub-accounts entirely.
Click Update Options to save the settings.
Verify the Configuration
Follow these steps to confirm the plugin is working as expected after saving the settings.
Test the Signup Form
Open a private or incognito browser window.
Navigate to the corporate sub-account signup URL.
The corporate sub-account signup URL includes a ?ca= query parameter. This parameter is provided by the Corporate Accounts add-on and identifies the parent account. The URL is accessible from the parent account holder’s account page under the Manage Sub Accounts section
Confirm that fields with the “Show for Sub-account” checkbox unchecked do not appear on the signup form.
Complete the sub-account registration.
Test the Account Page
Log in as the newly created sub-account user.
Navigate to the Account page.
Confirm that fields with the “Show for Sub-account” checkbox unchecked do not appear on the account page.
How Validation Is Handled
The plugin suppresses validation errors for hidden fields automatically. No additional code or configuration is needed.
When a field is hidden from sub-accounts, the following applies:
The field does not appear on the sub-account signup form or account page;
If the field is marked Required in MemberPress settings, that requirement is bypassed for sub-accounts;
Sub-accounts can complete signup and save account changes without triggering a validation error for the hidden field;
Parent account holders are not affected. They continue to see and interact with all fields as configured in the MemberPress Fields settings.
The “Show for Sub-account” checkbox controls visibility and validation for sub-accounts only. Changes to this setting do not affect how fields appear for parent account holders or regular (non-corporate) members
Wrap-Up
After activating and configuring the plugin, sub-accounts see only the custom fields marked “Show for Sub-account” in the MemberPress Fields settings. Hidden fields are removed from both the signup form and the account page. Validation errors for hidden required fields are suppressed automatically. No code changes or theme edits are required.
Public Facing Documentation / Additional References
MemberPress displays all active custom fields to every user during signup and on the account page. This includes gift recipients who claim a membership through the MemberPress Gifting add-on. Because MemberPress does not distinguish between regular subscribers and gift claim recipients when rendering custom fields, all fields configured under Dashboard > MemberPress > Settings > Fields appear on every signup form and account page.
Fields intended only for paying subscribers can be irrelevant or confusing to gift recipients. When those fields are set as required, they block the gift claim flow with validation errors the recipient cannot resolve.
The Hide Claim Fields for MemberPress Gifting helper plugin resolves this. It adds a “Show for Gift Claim” checkbox to each custom field in MemberPress settings. Unchecking a field hides it from gift claim signup forms and gift-only account pages. Validation for hidden required fields is automatically suppressed.
Troubleshooting
Requirements
The following must be installed and active before using this plugin:
WordPress;
MemberPress;
MemberPress Gifting add-on.
The MemberPress Gifting add-on is available on the MemberPress Scale plan. If the add-on is not listed under Dashboard > MemberPress > Add-ons, confirm the active license plan before proceeding
Cause of the Issue
MemberPress renders all configured custom fields on every signup form and account page. The Gifting add-on does not include built-in controls to limit field visibility based on the transaction type. As a result, gift recipients encounter fields intended only for regular paying subscribers. Required fields they cannot complete will block the claim flow entirely.
Downloading the Plugin
Download the plugin from the GitHub releases page:
Under the Assets section, click the .zip file to download it.
If no .zip asset is listed, click Source code (zip) instead.
Installing the Plugin
Log in to the WordPress admin dashboard.
Navigate to Dashboard > Plugins > Add New.
Click Upload Plugin at the top of the page.
Click Choose File and select the downloaded .zip file.
Click Install Now.
Click Activate Plugin after installation completes.
If MemberPress or the Gifting add-on is not active, an admin notice will appear: “Hide Claim Fields for MemberPress Gifting requires MemberPress and the MemberPress Gifting add-on.” Ensure both are active before proceeding.
Configuring Field Visibility
Navigate to Dashboard > MemberPress > Settings, and click the Fields tab.
Locate the Custom User Information Fields list.
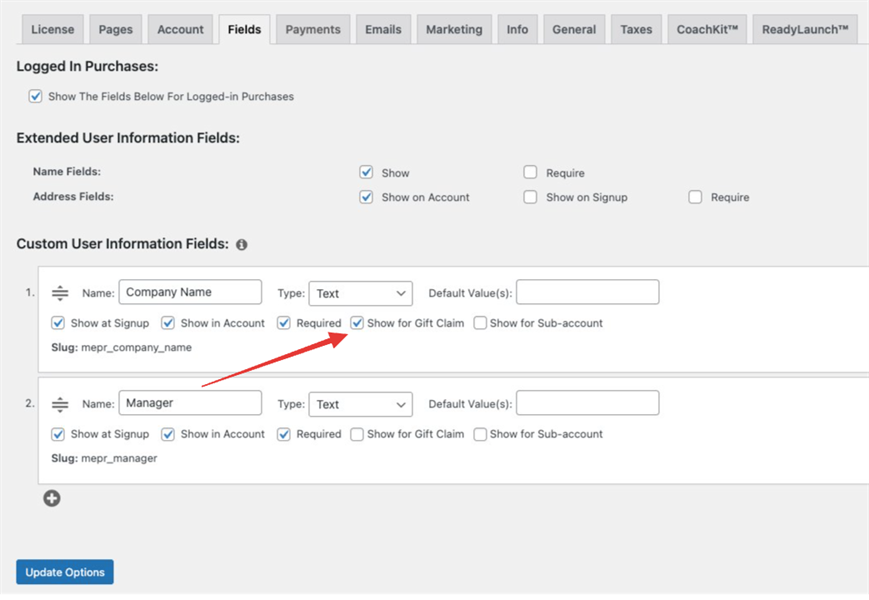
For each custom field row, find the Show for Gift Claim checkbox next to the Required checkbox.
Uncheck Show for Gift Claim for any field that should not be visible to gift recipients.
Click Update Options to save.
After saving, gift claim recipients will no longer see unchecked fields during:
Gift claim signup forms;
The account page for gift-only users;
ReadyLaunch™ account page displays.
Regular subscribers are not affected by these settings. The Show for Gift Claim checkbox controls visibility for gift claim flows only. All other signup forms and account pages continue to display fields according to the standard MemberPress field configuration.
Verification Checklist
After configuring field visibility, confirm the following:
The gift claim signup form no longer displays the unchecked fields;
A required field that was hidden does not produce a validation error during the claim flow;
The account page for a gift-only user does not show the hidden fields;
A regular subscriber’s signup form and account page are unaffected.
Known Limitations
The plugin controls visibility for gift claim flows only. Per-membership field overrides configured under Membership Options are a separate setting and are not affected;
The Show for Gift Claim checkbox applies globally to each custom field. Granular control per membership is not available in v1.0.0;
Default MemberPress fields (name, address) are not controlled by this plugin. Only custom fields created under Custom User Information Fields are affected.
Public Facing Documentation / Additional References
This document explains how to add a vCard QR code to a MemberPress ClubDirectory™ member profile page. When scanned, the QR code allows visitors to instantly save the profile member’s contact information — including name, email, phone, website, and address — directly to their device as a vCard contact.
This solution requires installing the Effortless QR Code Generator plugin and adding a custom PHP shortcode via the WPCode plugin. Once in place, the shortcode is added to the active ClubSuite™ Profile template using a Shortcode block. The QR code automatically renders with the data of whichever member’s profile is currently being viewed.
This document also covers common troubleshooting scenarios, including mismatched custom field slugs, the GD library requirement for server-side QR generation, and how to extend the shortcode to support multiple phone number fields.
Troubleshooting
Initial Setup
Complete the following steps before adding the shortcode or troubleshooting any issues.
1) Effortless QR Code Generator Plugin Not Installed
The custom shortcode depends on the Effortless_QRCode_Native class provided by the Effortless QR Code Generator plugin. The QR code will not render if this plugin is missing or inactive.
How to Test/Fix:
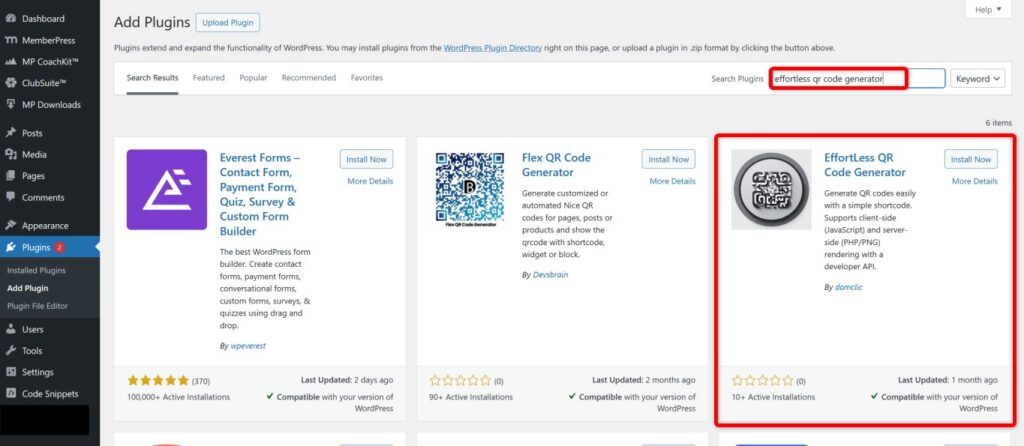
Navigate to Dashboard > Plugins > Add New Plugin.
Search for “Effortless QR Code Generator”.
Click Install Now, then click Activate.
No additional plugin configuration is required after activation. The plugin’s PHP API is available immediately for use in custom code.
2) PHP GD Library Not Available on the Server
The shortcode uses the server-side PNG generation method (Effortless_QRCode_Native::generate_png). This method requires the PHP GD library to be enabled on the server. If GD is not available, the QR code will not generate and the shortcode will return an empty output.
How to Test/Fix:
Ask the user to check whether their hosting environment has GD enabled. This is typically found under Dashboard > Tools > Site Health > Info > Server.
If GD is not listed, the user should contact their hosting provider to enable it. GD is included in most managed WordPress hosting environments by default.
As an alternative, direct the user to the client-side rendering mode offered by the Effortless QR Code Generator plugin’s built-in shortcode. Note that this alternative does not support vCard data encoding and is not suitable for this use case.
Adding the Custom Shortcode via WPCode
The following steps add the PHP shortcode that generates the vCard QR code. The recommended method is to use the WPCode plugin. Alternatively, the code can be added to the active child theme’s functions.php file.
Navigate to Dashboard > Code Snippets > Add Snippet.
Click Add Your Custom Code (New Snippet).
Enter a descriptive title, such as “MemberPress vCard QR Code Shortcode”.
Set the Code Type to PHP Snippet.
Paste the following code into the code editor:
/**
 * MemberPress ClubDirectory - vCard QR Code Shortcode
 * Displays a vCard QR code for the currently viewed ClubDirectory profile user.
 * Requires: Effortless QR Code Generator plugin (server-side/GD mode).
 * Usage: [memberpress_vcard_qr]
 * Attributes:
 *   size         - QR code image size in pixels (default: 150)
 *   show_download - Show a download button below the QR code: "true" or "false" (default: "true")
 *   phone_type   - vCard phone type label: CELL, HOME, or WORK (default: CELL)
 */
add_shortcode('memberpress_vcard_qr', function($atts) {
  $atts = shortcode_atts([
    'size'          => 150,
    'show_download' => 'true',
    'phone_type'    => 'CELL'  // Options: CELL, HOME, WORK
  ], $atts);

  $show_download = filter_var($atts['show_download'], FILTER_VALIDATE_BOOLEAN);
  $phone_type    = strtoupper($atts['phone_type']);

  // Requires ClubDirectory unhashid utility
  if (!method_exists('memberpress\directory\lib\Utils', 'unhashid')) {
    return '';
  }

  $hashed_id = get_query_var('mpdir_user_profile');
  if (empty($hashed_id)) {
    return '';
  }

  $user_id = memberpress\directory\lib\Utils::unhashid($hashed_id);
  if (!$user_id) {
    return '';
  }

  $user_info = get_userdata($user_id);
  if (!$user_info) {
    return '';
  }

  // Retrieve user data
  $first_name = get_user_meta($user_id, 'first_name', true);
  $last_name  = get_user_meta($user_id, 'last_name', true);
  $full_name  = trim($first_name . ' ' . $last_name) ?: $user_info->display_name;
  $email      = $user_info->user_email;
  $website    = $user_info->user_url;

  // Phone field - update slug on line below if using a different custom field slug
  $phone      = get_user_meta($user_id, 'mepr_phone_number', true);
  $phone_clean = preg_replace('/[^0-9+]/', '', $phone);

  // MemberPress default address fields
  $address1 = get_user_meta($user_id, 'mepr-address-one', true);
  $address2 = get_user_meta($user_id, 'mepr-address-two', true);
  $city     = get_user_meta($user_id, 'mepr-address-city', true);
  $state    = get_user_meta($user_id, 'mepr-address-state', true);
  $zip      = get_user_meta($user_id, 'mepr-address-zip', true);
  $country  = get_user_meta($user_id, 'mepr-address-country', true);
  $street   = trim($address1 . ' ' . $address2);

  // Build vCard 3.0 string
  $vcard_data  = "BEGIN:VCARD\n";
  $vcard_data .= "VERSION:3.0\n";
  if (!empty($full_name))                          $vcard_data .= "FN:$full_name\n";
  if (!empty($first_name) || !empty($last_name))   $vcard_data .= "N:$last_name;$first_name;;;\n";
  if (!empty($email))                              $vcard_data .= "EMAIL:$email\n";
  if (!empty($phone_clean))                        $vcard_data .= "TEL;TYPE=$phone_type:$phone_clean\n";
  if (!empty($website))                            $vcard_data .= "URL:$website\n";
  if (!empty($street) || !empty($city) || !empty($state) || !empty($zip)) {
    $vcard_data .= "ADR:;;$street;$city;$state;$zip;$country\n";
  }
  $vcard_data .= "END:VCARD";

  // Generate QR code PNG via Effortless QR Code Generator
  if (!class_exists('Effortless_QRCode_Native')) {
    return '';
  }

  $result = Effortless_QRCode_Native::generate_png($vcard_data, intval($atts['size']));
  if (!$result || empty($result['url'])) {
    return '';
  }

  $filename = sanitize_title($full_name) . '-vcard.png';

  $html  = '<div class="memberpress-vcard-qr" style="text-align:center;">';
  $html .= '<img src="' . esc_url($result['url']) . '"'
         . ' alt="vCard QR code for ' . esc_attr($full_name) . '"'
         . ' width="' . intval($atts['size']) . '"'
         . ' height="' . intval($atts['size']) . '"'
         . ' style="max-width:100%; height:auto;">';

  if ($show_download) {
    $html .= '<div style="margin-top:12px;">';
    $html .= '<a href="' . esc_url($result['url']) . '"'
           . ' download="' . esc_attr($filename) . '"'
           . ' style="display:inline-block; padding:8px 16px; background-color:#0073aa;'
           . ' color:#ffffff; text-decoration:none; border-radius:4px; font-size:14px;">';
    $html .= 'Download QR Code';
    $html .= '</a>';
    $html .= '</div>';
  }

  $html .= '</div>';
  return $html;
});
Set the Insert Method to Auto Insert and the Location to Run Everywhere.
Toggle the snippet status to Active.
Click Save Snippet.
Adding the Shortcode to the ClubSuite™ Profile Template
Navigate to Dashboard > ClubSuite™ > Profiles.
Hover over the currently active profile and click Edit.
In the block editor, click the + icon to add a new block in the desired location on the profile layout.
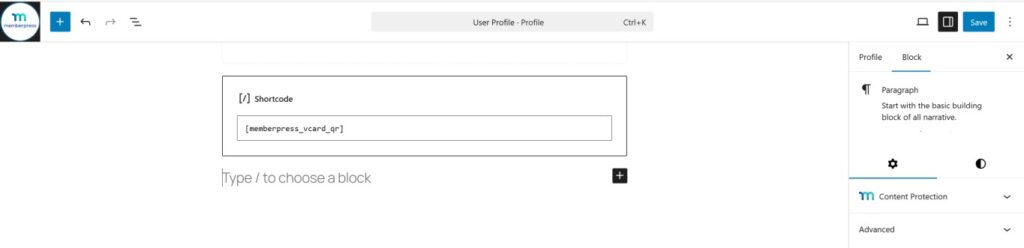
Search for and select the Shortcode block.
Enter [memberpress_vcard_qr] in the shortcode field.
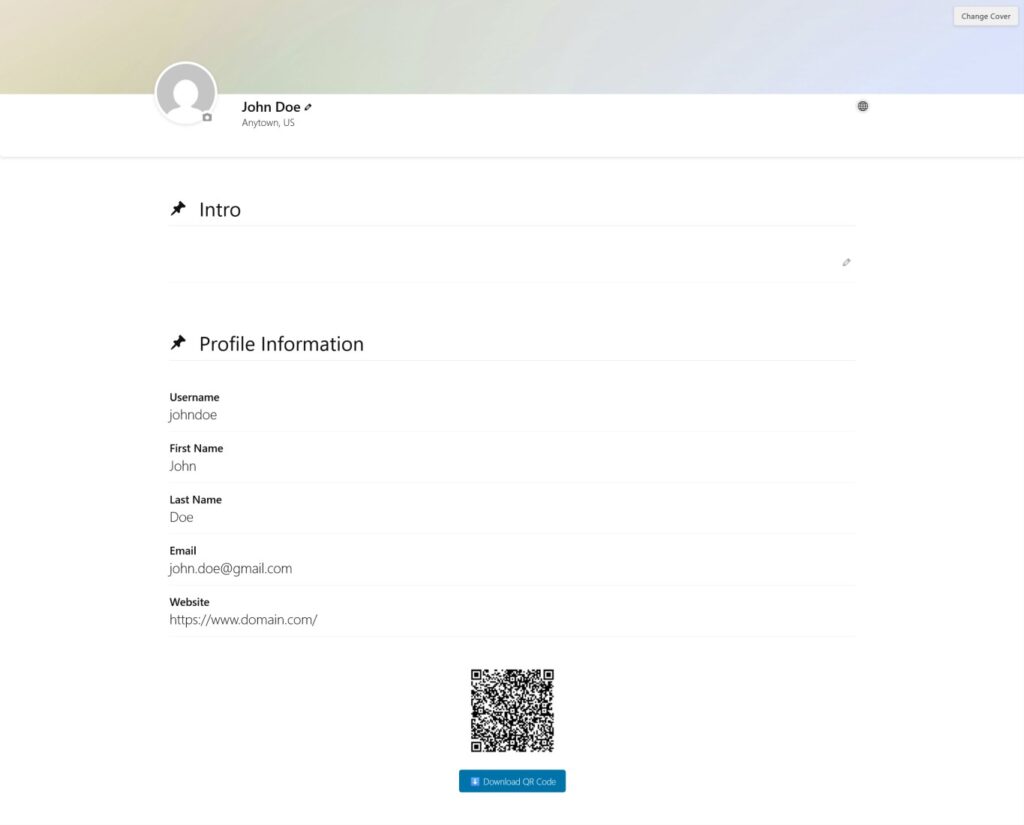
Click Update to save the profile template.
Once saved, the QR code will appear on each member’s profile page, populated with that member’s data. The result should resemble the following:
Shortcode Attributes
The [memberpress_vcard_qr] shortcode supports the following optional attributes:
Attribute
Default
Description
Example
size
150
QR code size in pixels
[memberpress_vcard_qr size="200"]
show_download
true
Show or hide the download button
[memberpress_vcard_qr show_download="false"]
phone_type
CELL
Phone number type (CELL, HOME, WORK)
[memberpress_vcard_qr phone_type="WORK"]
size — Sets the QR code image dimensions in pixels. Accepts any integer. Default: 150. Example: [memberpress_vcard_qr size="200"]
show_download — Controls whether a download button appears below the QR code. Accepts “true” or “false”. Default: “true”. Example: [memberpress_vcard_qr show_download="false"]
phone_type — Sets the vCard phone type label used when the QR code is scanned. Accepts CELL, HOME, or WORK. Default: CELL. Example: [memberpress_vcard_qr phone_type="WORK"]
Common Issues After Setup
3) Phone Number Field Not Appearing in the QR Code
The shortcode reads the phone number from a custom field with the meta key mepr_phone_number. This slug is generated automatically by MemberPress based on the field name. If the user created their phone field with a different name, the meta key will differ and the field will return empty.
How to Test/Fix:
Navigate to Dashboard > MemberPress > Settings > Fields tab.
Locate the phone number field under Custom User Information Fields.
Note the field slug displayed beneath the field name. The meta key used in the database will be “mepr_” followed by this slug (e.g., a slug of phone_number produces the meta key mepr_phone_number).
In the WPCode snippet, locate line 41: $phone = get_user_meta($user_id, 'mepr_phone_number', true);
Replace mepr_phone_number with the correct meta key for the site’s phone field.
Click Save Snippet in WPCode.
The MemberPress Fields documentation at Dashboard > MemberPress > Settings > Fields tab explains how custom field slugs are generated. The meta key stored in the database is always prefixed with mepr_
4) QR Code Does Not Appear on the Profile Page
If the shortcode renders no output, one of several conditions may be preventing the QR code from generating. The shortcode performs several checks and returns empty silently on failure.
How to Test/Fix:
Confirm the Effortless QR Code Generator plugin is installed and active under Dashboard > Plugins.
Confirm the WPCode snippet is saved with status set to Active.
Confirm the shortcode is being used on an actual ClubDirectory profile page. The shortcode reads the mpdir_user_profile query variable. It will not render on any other page type.
Check that the PHP GD library is available on the server (see Issue 2 above).
If all of the above conditions are met and the QR code still does not render, enable WordPress debug mode temporarily to check for PHP errors related to the snippet.
5) Supporting Multiple Phone Number Fields in the QR Code
By default, the shortcode encodes a single phone number. If the site collects separate mobile, work, and home phone numbers using distinct MemberPress custom fields, the vCard can be extended to include all three.
How to Test/Fix:
In the WPCode snippet, replace the single phone block (lines 41–43) with the following code. Update the meta key values to match the slugs of the site’s actual custom fields:
// Multiple phone fields - update meta key slugs to match the site's custom field slugs
$mobile = get_user_meta($user_id, 'mepr_phone_number', true);   // Update slug if needed
$work   = get_user_meta($user_id, 'mepr_work_phone', true);     // Update slug if needed
$home   = get_user_meta($user_id, 'mepr_home_phone', true);     // Update slug if needed

if (!empty($mobile)) $vcard_data .= "TEL;TYPE=CELL:" . preg_replace('/[^0-9+]/', '', $mobile) . "\n";
if (!empty($work))   $vcard_data .= "TEL;TYPE=WORK:" . preg_replace('/[^0-9+]/', '', $work) . "\n";
if (!empty($home))   $vcard_data .= "TEL;TYPE=HOME:" . preg_replace('/[^0-9+]/', '', $home) . "\n";
When using multiple phone fields, remove or comment out the original single $phone and $phone_clean variable declarations and the single TEL line in the vCard build section, to avoid duplicating the phone entry.
Public Facing Documentation / Additional References
By default, the MemberPress Offline payment gateway does not support the Order Bumps add-on or multiple subscriptions. The Order Bumps tab is hidden on any membership that uses only the Offline gateway, and order bump selections made during checkout are silently ignored.
This article provides a PHP code patch that extends the Offline gateway’s declared capabilities to include order-bumps and multiple-subscriptions, and adds the processing logic required to create a MeprOrder, link all relevant transactions and subscriptions, and handle each order bump product correctly during the offline signup flow.
This solution is intended for sites that rely on the Offline gateway and need Order Bumps functionality without switching to an online payment processor. The patch is applied as a custom PHP snippet and does not modify any MemberPress core files.
Troubleshooting
Order Bumps Not Visible or Not Processing on Offline Gateway Checkouts
1) Order Bumps Tab Is Hidden for Memberships Using the Offline Gateway
MemberPress checks each payment gateway’s declared capabilities array before showing the Order Bumps tab in the membership editor. Because MeprArtificialGateway (the Offline gateway class) does not declare order-bumps or multiple-subscriptions in its capabilities, the tab remains hidden and order bumps cannot be configured.
How to Test/Fix:
The first function in the patch below hooks into init at priority 5 and appends the missing capabilities to every instance of MeprArtificialGateway found in the site’s configured payment methods. After the patch is active, navigate to Dashboard > MemberPress > Memberships, open any membership, scroll to Membership Options, and confirm the Order Bumps tab is now visible.
2) Order Bump Selections Are Ignored During Offline Checkout
Even after the Order Bumps tab becomes visible and bumps are configured, the Offline gateway’s signup routine does not contain the logic to read mepr_order_bumps POST data, create a MeprOrder, or process the additional products. As a result, only the primary membership transaction is recorded and order bump items are never created.
How to Test/Fix:
The second function in the patch hooks into mepr_signup at priority 99 and runs after the primary transaction has been stored. It reads the mepr_order_bumps POST array, validates the product IDs via MeprCheckoutCtrl::get_order_bump_products(), creates a MeprOrder to group the primary transaction with the bumps, links any existing subscription to the order, then iterates over each bump product and calls either process_payment() or process_create_subscription() depending on whether the product is a one-time or recurring membership. Errors for individual bump products are logged to the PHP error log and do not interrupt the main checkout.
3) Order Bump Data Persists in POST and Causes Redirect Errors
After the offline signup completes and MemberPress redirects the user to the Thank You page, any residual mepr_order_bumps values remaining in the $_POST superglobal can trigger unintended re-processing or errors during redirect handling.
How to Test/Fix:
The third function in the patch also hooks into mepr_signup at priority 99 and unsets $_POST['mepr_order_bumps'] after processing completes, ensuring the data does not carry over to subsequent hooks or the redirect routine.
Adding the Code Patch
Add all three functions together as a single snippet. The recommended method is to use the WPCode plugin. As an alternative, the code can be added to the functions.php file of a child theme.
Important: This patch modifies runtime gateway capabilities and signup behavior. Test thoroughly in a staging environment before deploying to production. Always use a child theme if adding code to functions.php to prevent changes from being overwritten by theme updates.
Adding the Patch via WPCode (Recommended)
Navigate to Dashboard > Code Snippets > Add Snippet.
Hover over “Add Your Custom Code (New Snippet)” and click Use Snippet.
Enter a descriptive title, such as “MemberPress – Offline Gateway Order Bumps Patch”.
Set the code type to PHP Snippet.
Paste the full code below into the code editor.
Under Insertion, set the location to Run Everywhere.
Toggle the snippet to Active and click Save Snippet.
Adding the Patch via Child Theme functions.php
Connect to the site via FTP or navigate to Dashboard > Appearance > Theme File Editor.
Open the functions.php file of the active child theme.
Paste the full code at the end of the file.
Save the file.
The Code
<?php
/**
 * Enables order bumps for the offline payment gateway.
 */
function mepr_offline_ob_patch_capabilities() {
  if ( ! class_exists( 'MeprOptions' ) || ! class_exists( 'MeprArtificialGateway' ) ) {
    return;
  }
  $mepr_options = MeprOptions::fetch();
  $pms          = $mepr_options->payment_methods( false );
  foreach ( $pms as $pm ) {
    if ( $pm instanceof MeprArtificialGateway ) {
      if ( ! in_array( 'order-bumps', $pm->capabilities, true ) ) {
        $pm->capabilities[] = 'order-bumps';
      }
      if ( ! in_array( 'multiple-subscriptions', $pm->capabilities, true ) ) {
        $pm->capabilities[] = 'multiple-subscriptions';
      }
    }
  }
}
add_action( 'init', 'mepr_offline_ob_patch_capabilities', 5 );

function mepr_offline_ob_process_order_bumps( $main_txn ) {
  // Only act on offline gateway transactions.
  if ( ! class_exists( 'MeprArtificialGateway' ) || ! class_exists( 'MeprCheckoutCtrl' ) ) {
    return;
  }
  $mepr_options = MeprOptions::fetch();
  $pm           = $mepr_options->payment_method( $main_txn->gateway );
  if ( ! ( $pm instanceof MeprArtificialGateway ) ) {
    return;
  }
  // Collect order bump product IDs from the signup form POST data.
  $ob_product_ids = isset( $_POST['mepr_order_bumps'] ) && is_array( $_POST['mepr_order_bumps'] )
    ? array_filter( array_map( 'intval', $_POST['mepr_order_bumps'] ) )
    : [];
  if ( empty( $ob_product_ids ) ) {
    return;
  }
  try {
    $ob_products = MeprCheckoutCtrl::get_order_bump_products( $main_txn->product_id, $ob_product_ids );
  } catch ( Exception $e ) {
    return; // Invalid product — silently bail.
  }
  if ( empty( $ob_products ) ) {
    return;
  }
  // Create the MeprOrder to group main txn + bumps.
  $order                         = new MeprOrder();
  $order->user_id                = $main_txn->user_id;
  $order->primary_transaction_id = $main_txn->id;
  $order->gateway                = $pm->id;
  $order->store();
  // Link the main transaction to the order.
  $main_txn->order_id = $order->id;
  $main_txn->store();
  // Link the main subscription (if any) to the order.
  $main_sub = $main_txn->subscription();
  if ( $main_sub instanceof MeprSubscription ) {
    $main_sub->order_id = $order->id;
    $main_sub->store();
  }
  // Create a transaction (+ subscription) per order bump.
  foreach ( $ob_products as $product ) {
    try {
      list( $ob_txn, $ob_sub ) = MeprCheckoutCtrl::prepare_transaction(
        $product,
        $order->id,
        $main_txn->user_id,
        $pm->id
      );
      if ( $product->is_one_time_payment() ) {
        $pm->process_payment( $ob_txn );
      } else {
        $pm->process_create_subscription( $ob_txn );
      }
    } catch ( Exception $e ) {
      // Log but don't break the main checkout.
      error_log( '[MeprOfflineOrderBumps] Failed to process order bump product #' . $product->ID . ': ' . $e->getMessage() );
    }
  }
}
add_action( 'mepr_signup', 'mepr_offline_ob_process_order_bumps', 99 );

function mepr_offline_ob_clear_obs_redirect( $main_txn ) {
  if ( ! class_exists( 'MeprArtificialGateway' ) ) {
    return;
  }
  $mepr_options = MeprOptions::fetch();
  $pm           = $mepr_options->payment_method( $main_txn->gateway );
  if ( $pm instanceof MeprArtificialGateway ) {
    unset( $_POST['mepr_order_bumps'] );
  }
}
add_action( 'mepr_signup', 'mepr_offline_ob_clear_obs_redirect', 99 );
Note: The MeprArtificialGateway class is the internal PHP class MemberPress uses for all Offline gateway instances. The patch targets this class specifically and will not affect any online payment gateways configured on the same site.
Verifying the Fix
After adding the snippet, navigate to Dashboard > MemberPress > Memberships and open a membership that uses the Offline gateway.
Scroll to Membership Options and confirm the Order Bumps tab is now visible.
Add one or more memberships as order bumps and click Update.
Visit the membership registration page while logged out and complete a test signup using the Offline gateway.
After signup, navigate to Dashboard > MemberPress > Transactions and confirm that separate transactions have been created for the primary membership and each selected order bump.
Confirm all transactions are linked to the same order under Dashboard > MemberPress > Orders.
Known Limitations
This patch does not add required order bump support. Order bumps configured as Required (a feature introduced in Order Bumps 1.0.4) are not enforced at the gateway level for the Offline gateway and should be left as optional when using this patch;
Renewal transactions for recurring order bump memberships acquired through this patch must still be created manually, consistent with standard Offline gateway behavior for all recurring subscriptions;
MemberPress Coupons applied at checkout will affect the primary membership only. They will not be applied to order bump items, consistent with standard Order Bumps behavior across all gateways;
This patch is not compatible with the MemberPress Gifting add-on. Order bumps will not be available on gift membership registration forms;
Public Facing Documentation / Additional References